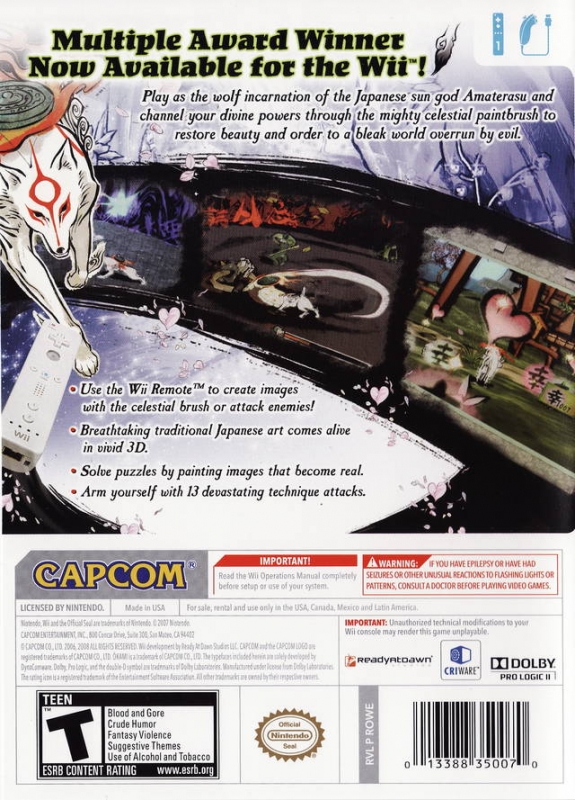
Okami is an adventure-puzzle game originally created for PlayStation 2 that was ported over to the Wii in April 2008. The game draws from Japanese mythology, in which the goddess of the sun takes the shape of a wolf to save Japan from darkness. One interesting feature within the game is that the Wii Remote can be used like a paintbrush to create objects and elements during gameplay.
Introduction
Control the main character, Amaterasu, in a mix of action, platform, and puzzle gaming genres, that has been considered comparatively similar to the gameplay style of The Legend of Zelda series. Although the game is primarily linear, there are multiple side quests and optional activities that allow the player to explore the game world and take the story at their own pace. Players earn Praise by completing these additional activities which is then spent to increase various statistics, e.g., health, celestial brush ink wells, etc.
-
Restoring Kamiki Village
- Move toward the light into the tree and enter the River of the Heavens.
- Issun instructs you to use the Origin Mirrors to save the game. After Issun's instructions save the game.
- Cross the bridge and break the pots by shaking the Wii Remote.
- Round the corner where Issun instructs you how to wall jump. Wall jump to the higher ledge, open the chest to receive a Holy Bone S, and break the pots to obtain yen.
- Move toward the broken bridge where Issun will restore the bridge with the Rejuvenation technique.
- Cross the bridge and go right towards to top of the hill.
- At the top of the hill Issun will instruct you how to use the Celestial Brush to draw a star. Draw the star to complete the constellation of Yomigami who will then appear to teach you the Rejuvenation technique.
- Go down the hill and towards the missing river. Hold down the B button and restore the river by drawing the river by holding the A button.
- Swim across the river and open the chest to receive the Astral Pouch.
- Enter the gate that leads to the Cave of Nagi
- Follow the path up the hill until you reach a bridge.
- Before crossing the bridge swim over the river to the piece of land on the right where you will find a chest behind the a tree and rock. Open the chest and receive a Stray Bead.
- Swim back to the main path, cross the bridge, and continue along the path to the Cave of Nagi.
- Enter the cave. Upon entering the cave the entrance will be sealed behind you.
- Move towards the broken statue of Nagi's store and restore the sword using the Rejuvenation technique.
- After restoring the sword restore the constellation of Tachigami who will appear and teach you the Power Slash Technique.
- Demonstrate the Power Slash technique on a boulder by slashing the boulder in half.
- After your demonstration follow the arrow out of the cave by slashing the seal to the entrance of the cave.
- At the bottom of the cave entrance two Green Imps will appear. Attack them by waving the Wii Remote. When their health is depleted they will temporarily hover in the air. When this occurs Power Slash the Green Imps to receive Demon Fangs.
- Continue following the arrow down the path and confront two more Green Imps.
- Exit through the gate and back to the River of the Heavens. Continue following the arrow and exit the River of the Heavens and back to the entrance at the large tree.
- At the large tree use the Power Slash technique to cut the fruit down and restore Kamiki Village.
- Go down the hill and examine the statue of Kumoso.
- Take the path to the right and proceed to Kamiki Village.
- Examine the statues within Kamiki Village until Issun instructs you to find a high place.
- Go back to the fork in the road and take the left path this time leading you to a deck.
- At the deck use the Sunrise technique to draw a sun in the sky.
- After the cutscene you will battle with three Green Imps.
- Open the chest on the right and receive seeds.
- Go around the mountain where you will notice sparrows. Walk up to the sparrows and press the Z button to feed the sparrows seeds.
- Go back to the fork in the road and you will notice that all the statues have been restored to people.
- Talk to Komuso and fight a few Green Imps. Perform the Power Slash technique to quickly defeat the Green Imps. If you defeat the Green Imps within 10 seconds Komuso will reward you with praise.
- Beside Komuso feed a group sparrows Seeds.
- Dig up and open a chest by the sparrows to obtain a Traveler's Charm. The location of the chest is best seen at night.
- At the fork in the road on the right side look up underneath the deck on top of two beams are two chests. Perform a Power Slash technique on the chests to obtain a Stray Bead and Glass Beads.
- Go back down to Kamiki village and swim to an island to the right of the path.
- Go behind the rock on the island and open a chest to obtain a Dragonfly Bead.
- Dig up and open a chest on the island to obtain a Wooden Bear. The location of the chest is best seen at night.
- Swim back to the mainland and enter the first house on the right. Dash the double doors in the house then dig up and open a chest in the center of the room to obtain a Coral Fragment.
- Go to the next house and feed some chickens next to the house seeds.
- Talk to a little boy named Mushi next to a turnip field and a dog.
- Feed the dog next to Mushi Meat.
- Then talk to Mushi's Mama who will teach you how to dig by rapidly pressing the C button. Dig up all 10 turnips in the turnip field while avoiding Mushi's Mama by covering her with ink before she hits you. After you dig up all 10 turnips you will receive the Oddly Shaped Turnip. Take the Oddly Shaped Turnip to Mushi who will then reward you with praise.
- Feed a group of sparrows beside the turnip field seeds.
- Dig up and open a chest in the corner of the turnip field to obtain a Dragonfly Bead.
- Continue down the path until you reach Kushi on the right. Talk to Kushi. She will tell you to continue talk to people while a green triangle appears above their head. Continue to talk to her until the green triangle disappears.
- Before you cross the bridge follow the river to Mrs. Orange. She will tell you she is missing a pole to hang her laundry. Use the Rejuvination technique by drawing a horizontal line between two pole stands to restore the pole. After restoring the pole use the Sunrise technique to draw a sun in the sky to dry Mrs. Orange's laundry.
- Wall jump on the mountain behind Mrs. Orange onto a ledge and open a chest to obtain an Exorcism Slip S.
- Use the Power Slash technique on three chests in the river to obtain Glass Beads, a Rabbit Statue, and a Vase.
- Proceed over the bridge until you reach the Merchant standing infront of a giant boulder. Talk to the Merchant and fight two Green Imps and one Red Imp.
- The Merchant will ask you to bring him Susano to remove the large boulder. Follow the arrow into Susano's home. In Susano's home you will here snoring coming from the large vase on the right. #Examine the large vase and perform a Power Slash technique on the vase to remove the vase and reveal the entrance to the basement. Enter the basement where you will see Susano sleeping. Try to talk to Susano and then perform a headbutt by shaking the Wii Remote.
- After waking up Susano take Susano to the Merchant. Susano will tell the Merchant that he will need to train before he will be able to remove the large boulder.
- Follow Susano behind his house next to his practice dummies.
- Feed some sparrows behind Susano's house on the right seeds.
- Talk to Susano, who will inform you he cannot begin his training without sake.
- Go back and talk to Kushi next to the mill. She will tell you that her water wheel is broken. Perform the Rejuvenation technique on the water wheel to repair the water wheel. Go into the mill and talk to Kushi. She will reward you with her sake Vista of the Gods.
- Take the Vista of the Gods to Susano. Susano will then begin to train. Perform a Power Slash technique after all his slashes. Slash both practice dummies and two boulders.
- Sakuya will then appear and mark your map of the locations of the Guardian Saplings.
- Feed a group of rabbits by an Origin Mirror.
- Save your game on the Origin Mirror.
- Before you leave the village collect all the treasure chests and purchase 4 seeds to feed the sparrows and chickens, 1 herb to feed the rabbit, and 1 meat to feed the dog, then leave the village.
-
Restoring Shinshu Field
- Follow the path to the left to the Nameless Man's house.
- Talk to the Nameless Man.
- Continue along the path and over the bridge.
- Enter the cave and into Hana Valley.
- Save the game at the Origin Mirror
- Go down the path and open the chest to get a Traveler's Charm.
- Cross the bridge and fight 3 Green Imps and 2 Red Imps at the campfire.
- Head through the tunnel where you will find Evil Trees. Perform the Power Slash technique when the Evil Trees throw fruit at you to hit the fruit back at the Evil Trees and stun the tree. After the trees are stunned, run past the trees.
- Follow the path past the Evil Trees to a cave where you will fight 2 Green Imps and a Yellow Imp. Finish off all the imps with a Power Slash technique to receive Demon Fangs. After the fight you will see Susano and a painting on the wall
- After the fight examine the painting on the wall and use the Sunrise technique to draw the missing sun on the painting.
- Follow Susano deeper into the cave until you reach a sapling at the end of the cave.
- On the left you will see a sealed entrance to another path. Perform the Power Slash technique to open the pathway.
- Follow the pathway to an Origin Mirror and save the game.
- At the end of the path you will see Susano training again. Follow Susano's strikes with a Power Slash technique. You will have to Power Slash 4 torches and a sleepy bear balancing on a ball.
- After Susano leaves push the ball the sleepy bear was balancing on into the room with the sapling. Place the ball on a ledge overlooking the tiny sapling.
- Use the Sunrise technique in the sky to make the sapling grow.
- After the sapling grows another unfinished constellation appears. Draw in the two missing stars to obtain the Bloom technique from Sakigami.
- Proceed to exit the cave where you will encounter more Green Imps and Yellow Imps.
- After the encounter a Boar and Boar Piglets appear. Feed the Boar and Boar Piglets Seeds.
- Exit the cave and follow the path where you previously saw the Evil Trees. Once again perform a Power Slash technique to hit the fruits back at the Evil Tree. After the Evil Tree is stunned use the Bloom technique to dispose of the Evil Tree.
- Follow the path until you see a cursed path of grass. Use the Bloom technique on the path of grass and receive the Travel Guide: Greensprout Tips.
- Before crossing the bridge use the Bloom technique on another Evil Tree.
- Past the Evil Tree wall jump off a green section of the wall to a ledge. Dig up a clover and use the Bloom technique on the clover.
- Go back down the ledge and cross the bridge to bloom 2 Evil Trees and 3 withering trees.
- Follow the path through the cave again and fight another group of imps at the campfire.
- After the encounter monkeys appear. Feed the monkeys anything but seeds.
- Use the Bloom technique on the 6 trees around the campfire.
- Jump to to the small island in the water where you will find a chest containing Travel Guide: Digging Tips. Also on the island dig up a clover and use the Bloom technique on the clover and another withered tree.
- Swim back to the main path and use the Bloom technique on 2 more withered trees near the Origin Mirror.
- Once the Evil Trees and withered trees are bloomed a chest will appear in the cave with the painting in it. Open the chest and receive a Sun Fragment.
- Before leaving Hana Valley dig up a treasure at night next to the cave where you first encountered the Evil Tree.
- Dig up another clover on a small strip of land behind the Origin Mirror at the entrance of Hana Valley.
- Follow the path to the center of Shinshu Field and use the Bloom technique on the Guardian Sapling.
- Open the chest infront of the Guardian Sapling to get the Travel Guide: Fleeing Battle.
- Open the chest behind the Guardian Sapling for a Traveler's Charm.
- Talk to the merchant left of the Guardian Sapling and buy a few Seeds and Herbs.
- Look behind the merchant along the river and dig up and bloom a clover.
- Follow the path away from the Guardian Sapling and towards Kamiki Village to a patch of cursed grass. Use the Bloom technique on the grass and feed the boars, that appear after the grass is restored, seeds.
- Follow the path toward the Nameless Man's and across a bridge until you reach a Devil Gate. Enter the Devil Gate and fight a few Green Imps and Red Imps.
- Feed the hares seeds once the Devil Gate is destroyed and the Nameless Man's Kiln is restored
- Go behind the left kiln along the edge of Shinshu Field and dig up a chest with a stray bead. The location of chest is shown at night.
- Continue along the path away from the Nameless Man's House and Kiln until you reach a man named Ida. Talk to Ida and offer him a Traveler's Charm.
- Leave the path and follow the river behind the Guardian Sapling until you reach the second Devil Gate. Enter the Devil Gate and defeat Red Imps and Yellow Imps. Feed the hares, that return once the Devil Gate is destroyed, Seeds.
- Jump onto the ledge above the Devil Gate and dig up a chest with a stray bead.The location of chest is shown at night.
- Dig up and bloom a clover on the ledge above the Devil Gate towards the path.
- Get back on the path, pass the crack in a wall, and up the hill. Feed more hares, at the top of the hill, seeds.
- At the top of the hill follow the sign that says To Pyrotechnist's House down a hill. At the bottom of the hill use the Bloom technique on a tree to the right of the path.
- Proceed to the Pyrotechnist's House until you reach a fight with a Dead Fish. Use the Power Slash technique on the Dead Fish to remove it's wings and defeat it when it is on the ground.
- Use the Bloom technique on a tree outside the Pyrotechnist's House and open the chest infront of the house to receive Travel Guide: Legend of Orochi.
- Enter the house at night time and speak to the pyrotechnist Tama. Draw the symbol shown on his wall in the pot to set off the fireworks.
- Complete another constellation and receive the brush technique Cherry Bomb from Bakugami.
- Use the Cherry Bomb technique on the cracked wall infront of Tama's House to reveal a chest containing a Rat Statue.
- Follow the water behind Tama's House until you reach sparrows. Feed the sparrows seeds.
- Continue along the water until you reach a dock where you can dig up a chest containing a vase. The location of the chest is appears at night.
- Go back up the hill to the main path and back track to where you previously saw a crack on a wall. Use the Cherry Bomb technique on the wall and open a chest containing Exorcism Slip S.
- Continue along the path past the Pyrotechnist's House and follow the sign to the Moon Shrine. Enter the Moon Shrine and talk to Priest Mika and receive Mika's Monster Notebook.
- Exit the Moon Shrine and encounter one of the monsters in Mika's Monster Notebook.
- Before going back up hill onto the main path go to the left of the path where you will see two trees to bloom and a chest to dig up containing a stray bead. The location of the chest is best seen at night.
- Follow the path back up the hill and onto the main path and cross the bridge. Follow the sign that says Agata Forest Port. At the port feed the boars seeds and use the Bloom technique on a path of cursed grass. Then once the grass is restored use the Cherry Bomb technique to reveal a chest contain Travel Guide: Feeding.
- Go back to the main path and down the hill where you will reach a group of Horses to feed Herbs.
- Follow the path to another Devil Gate and defeat Green Imps and Yellow Imps. Feed the pigs, that return after the Devil Gate is destroyed, Seeds.
- Go behind the Dojo and dig up a chest containing a stray bead. The location of the chest is best seen at night.
- Enter the Dojo and talk to Onigiri Sensei. Purchase the 4 Winds technique for 5000 yen. Enter the training room behind Onigiri Sensei. Practice the 4 Winds technique until you are rewarded with Holy Bone M.
- Talk to Onigiri Sensei again and purchase the Fleetfoot technique for 10000 yen.
- Leave the dojo and follow the main path to the bottom of the hill and to another Devil Gate. Enter the Devil Gate and defeat the imps. Once the Devil Gate is destroyed open the chest that appears to receive a Vengeance Slip.
- Follow the path back to Kamiki Village. Before leaving Shinshu Field and entering Kamiki Village use the Bloom technique on the six withered trees the line the path.
-
Restoring Agata Forest
- Talk to Komuso, who informs you to bloom 15 trees.
- Use the bloom technique on the tree beside Komuso and the bridge.
- Use the bloom technique on the tree to the left of Susano's' house.
- Use the bloom technique on two trees on the opposite side of the river to the left and right of Mrs. Orange.
- Use the bloom technique on the the tree beside to the rice field.
- Use the bloom technique between Kushi's house and Mushi's house.
- Use the bloom technique infront of Oranges' house.
- Use the bloom technique on the four trees leading out of Kamiki village and to the fork in the road.
- Use the bloom technique on the four trees leading up to Mr. Orange and the sacred deck.
- Talk to Mr. Orange and bloom five seeds during his shuffle.
- Complete the constellation and obtain the Water Lily technique from Hasugami.
- Use the Water Lily technique behind Susano's house onto an island where you will find a chest containing a Sun Fragment.
- Use the Water Lily technique to reach the island further away.
- On this island dig up a clover and use the Bloom technique on the clover.
- Dig up a chest to the left of the clover to obtain a Stray Bead. The location of the chest is best seen at night.
- Dig up a chest to the right of the clover to obtain an Inkfinity Stone. The location of the chest is best seen at night.
- Head to the Guardian Sapling where the game originaly began and use the Power Slash technique to cut down a Guardian Fruit to receive a Bull Horn.
- Talk to Camille and Camellia and use the dash attack.
- Go back to Shinshu Field
- Head to Agata Forest through the water tunnel. Use the Water Lily technique to get through the water tunnel.
- Use the Cherry Bomb technique on the crack to enter the Agata Forest.
- Follow the path down the hill, take stairs on the left down do the beach, and enter the cave on the right.
- Use the Origin Mirror to save.
- Enter Madame Fawn's house in the cave.
- Open the chest to obtain a Stray Bead.
- Exit the cave and follow a path to the right of the stairs along the water to a cave behind a waterfall.
- Use the Cherry Bomb technique on the crack inside the cave to reveal the sapling.
- Use the bloom technique on the sapling.
- Open the chest to obtain a Devout bead.
- Feed the hares on the right of the sapling herbs
- Dig up the clover behind the sapling and use the Bloom technique.
- Exit the cave and jump on the island in the water where you will encounter Waka.
- Keep your distance from Waka and use the Power Slash technique on the projectiles when Waka throws them to knock them back to stun him. Then slash at Waka with the Devout beads. Repeat this until Waka is defeated.
- From the island you're standing, jump to an island with a big tree. You'll find a giant bud. Use the Bloom technique on the bud to obtain Glass Beads.
- Swim to a bigger island with a large boulder and tree with two giant buds. Use the Bloom technique on the two Giant Buds to obtain a Holy Bone S and a Lacquerware Set.
- Jump to another island with a big tree use the Bloom technique on a giant bud to get a Coral Fragment and dig up a Steel Soul Sake. The location of the chest is best seen at night.
- Swim to the next island with another Giant Bud, this one containing Steel Fist Sake.
- Go back to the cave that leads to Madame Fawn's house.
- Use the Bloom technique on a giant bud outside the cave to obtain a traveler's charm
- Dig up a chest on the beach next to the stairs leading to the cave to obtain a Dragonfly Bead. The location of the chest is best seen at night.
- Return to Madame Fawn's to find some hares to feed beside her house.
- Exit the cave and go up the stairs.
- Take the path left at the top of the stairs until you come across a merchant. Purchase two Gold Dust and upgrade your Devine Retribution and Devout Beads.
- Follow the path to the right of the merchant leading upwards to Hitoshio Spring at the top of the hill.
- Feed the deer on the right of the big tree behind Hitoshio Spring.
- Use the Water Lily technique to go behind the waterfall and into the cave. Use the Bloom technique to on the cursed grass to reveal a giant bud. Bloom the giant bud to obtain Incense Burner.
- Go back down the path away from Hitoshi Spring and talk to Kokari's father, Karude on the left of the path.
- Enter the Devil Gate by Karude and defeat two Dead Fish and one Yellow Imp. Feed the monkeys that are returned once the Devil Gate is destroyed Seeds, Meat, or Fish.
- Roll the large walnut that appears after you defeat the Devil Gate to the bear at the entrance of Agata Forest.
- Roll a large cabbage, found on the path towards the bear and the entrance, to the bear at the entrance of Agata Forest. Return back to where you defeated the Devil Gate.
- Use the Bloom technique on a giant bud along the water by the Devil Gate to obtain an Inkfinity Stone.
- Follow the path until you come across the signs that directing you to Tsuda Ruins and Taka Pass.
- Feed the sparrows on the path to the signs seeds.
- Talk to Kiba the demon fang trader and trade 50 Demon Fangs to obtain the Golden Lucky Cat and equip it.
- Open a chest next to Kiba to obtain Travel Guide: Battle Tips,
- Continue along the path down the hill from Kiba to some deer to feed herbs.
- continue along the path to find more deer to feed herbs.
- Further along, until you reach Susano and talk to him.
- Enter the Devil Gate behind Susano and defeat the imps. Feed the sparrows that return seeds.
- Feed deers near the entrance to the Tsuta Ruins and the Devil Gate herbs and open a chest to obtain Travel Guide: Enhancing Weapons.
- Follow the path away from the entrance to the Tsuta Ruins until you see more deer to feed herbs.
- Continue along the path to the right and up the hill until you reach a crack in the wall. Use the Cherry Bomb technique to open the wall.
- Dig up a chest infront of the crack in the wall to obtain a stray bead, The location of the chest is best seen at night.
- Go back down the path until you see Karude's house. Dig a chest behind the house to obtain a Stray Bead.
- Feed the Nightingales behind the house seeds. The nightingales only show up during the day.
- Use the Bloom technique two Giant Buds containing Exorcism Slip S and Wooden Bear.
- A bit north of the house is a dead patch of grass to restore, which in turn makes some hares appear.
- Swim to the island with boy wearing rabbit ears named Kokari. Talk to him a few times and then dash Kokari to stop him from crying.
- Help Kokari by drawing a fishing line and catching the Giant Salmon to obtain the Ruins Key.
- Head to the Tsuta Ruins entrance and use the key to enter.
-
Saving Ume
- Follow the path and save the game at the Origin Mirror on the left.
- Take the path to the right and open the chest to obtain Travel Guide: Enhancing Divinity
- Use the Bloom technique on the giant bud to obtain a Traveler's Charm
- Defeat and use the Bloom technique on an evil tree.Use the bloom technique on a giant bud past the Evil tree to obtain a Steel Soul Sake.
- Open chest to obtain Vase in front of the door to the next room.
- Enter the next room and defeat and bloom two Evil Trees to the left of the entrance and one on an island in the middle of the water.
- Swim to the island and dig up a clover and use the Bloom technique on the clover.
- Enter the next room until you reach a giant bud. Use the Bloom technique on the bud to receive Incense Burner
- Wall jump up to the next level. After the wall jump turn around and follow a narrow path and dig up and bloom a clover at the end of the path.
- Go back to the water and use the Water Lily technique to cross the water and follow the path up until you reach a stone.
- Use the Bloom technique on a giant bud to the left of the stone to obtain a Steel Fist Sake.
- Pass the stone and downt he hill where you will encounter a Bud Ogre. Slash the Bud Ogre and use the Power Slash technique on the things the Bud Ogre shoots until a circle appears around the Bud Ogre, then use the Bloom technique on the Bud Ogre. Blooming the Bud Ogre will expose its center. Attack its center to damage the Bud Ogre. Finish off the Bud Ogre with the Bloom technique to obtain a Demon Fang.
- After defeating the Bud Ogre roll the stone at the top of hill down the hill and onto a switch to open the door to the next room.
- Fight two Bud Ogres in the next room.
- After defeating the Bud Ogres go to the left of the room and use the Power Slash technique on a gate to reveal a room with a giant bud with a Vengeance Slip.
- Go back to the center of the room and examine the log with small mushrooms on it. Use the Sunrise technique to make the mushrooms grow into platforms.
- Climb the large mushrooms to the next level. Use the Cherry Bomb technique on the cracked wall at the end of the path, walk through the doors and run down a long path.
- Follow the path until you talk to Issun and the path starts to crumble. Dash and run to avoid the crumbling path.
- Reach the locked door at the end of the path.
- Jump down the platforms to the right of the door to the bottom of the room and talk to Blockhead. Dash Blockhead and it will reveal its weakness. Draw two dots at the location of its weakness to break Blockhead.
- Bit the Exercising Arrow that appears in the center of the room and climb the platforms back to the locked door
- On the third platform use the Cherry Bomb technique on the black wall behind the three statues. To reveal a giant bud with a Stray Bead. #Climb to the top and unlock the door with the key.
- In the next room use the Bloom technique on a giant bud on the right to obtain an Exorcism Slip S.
- At the broken bridge use the Rejuvenate technique to repair the bridge.
- On the other side of the bridge save the game at an Origin Mirror.
- Jump up some ledges behind the Origin Mirror to reach a clover to dig up and bloom.
- Return back towards the Origin Mirror and into the door to the next room
- Destroy three Devil Gates and use the Bloom technique on two giant buds by the water to obtain a Holy Bone S and Lacquerware Set. After the Devil Gates are destroyed another log with growing mushrooms appear in the center of the room. Use the Sunrise technique to make the mushrooms grow into platforms.
- Climb the mushroom platforms and follow the path until you reach the statues spilling poisonous water. Dash these statues to clean up the water.
- Open the chest behind the statues to obtain the Tsuta Ruins Map.
- Jump down the waterfall. At the bottom of the waterfall turn around and enter a small cave behind the waterfall. Use the Cherry Bomb technique to open the cave and bloom a giant bud to obtain a Stray Bead.
- Use the Water Lily technique to travel down the river to the entrance of the Tsuta Ruins.
- Take the left path from the entrance defeat and bloom an Evil Tree on an island. Swim to the island and dig up and bloom a clover on the island.
- Swim to another island along the path and use the Bloom technique on a giant bud to obtain an Exorcism Slip S.
- Go back to the entrance of the Tsuta Ruins, and jump on the islands toward the bright light.
- Before entering the shiny light dig up and bloom a clover to the left of the entrance.
- Inside, bloom three patches of cursed grass to reveal a new constellation. Fill in the two missing stars to obtain the Vine technique from Tsutagami.
- Leave the room after obtaining the Vine technique and head to the room where you first encountered the Bud Ogre and rolled the stone onto the switch. At the entrance of the room use Vine technique on the Konohana Blossom above.
- Follow the path away from the Konohana Blossom until the you reach a giant bud with a Stray Bead.
- Turn around and pass the Konohana Blossom to a clover to dig up and blossom.
- Return to the room where you obtained the Vine technique from Tsutagami and use the Vine technique on a path of Konohana Blossoms to reach the door at the top of the room.
- Enter the next room and use the vine technique on more Konohana Blossoms until you reach a large structure with hooks.
- Use the vine technique on the hooks and the surrounding Konohana Blossoms to enter the next room.
- Save the game at the Origin Mirror in the next room.
- Follow the path to a chest on the right containing a Holy Bone S and a chest on the left containg a Travel Guide: Godhood Tips.
- Go through a Golden Gate and encounter the Spider Queen.
- Circle the Spider Queen and use the Vine technique on the hooks on the back of the Spider Queen and the surrounding Konohana Blossoms. Hooking three Konohana Blossoms exposes balls that you need to attack. Eliminate as many balls as you can before the Spider Queen closes her back. Once all the balls are eliminated the Spider Queen is defeated and you receive the Snarling Beast.
-
Raging Rapids
- Look above the islands where you faced Waka and went fishing with Kokari for Konohana Blossoms. Use the Vine technique on two Konohana Blossoms to which leads to a branch with a Bull Horn and a Stray Bead.
- Head to up the hill past the merchant to Hitoshio Spring and look above the water for another Konohana Blossom. Use the Vine technique on the Konohana Blossom to reach a small pool of water. Then use the Water Lily Technique in the pool of water to reach the chest containing a Stray Bead.
- Talk to Kohari which leads to a scene where you must use the Vine technique on Konohana Blossoms along the river and hooks attached to a log you will be traveling on.
- After the bridge is created feed Ume the dog then cross the log.
- On the other side of river feed the hares herbs and open a chest to obtain Travel Guide: Ink Bullet Tips,
- Use the Power Slash technique on a beehive under one of the Konohana Blossoms and roll the beehive to the bear by the entrance to Taka Pass.
- Follow the path to Taka Pass.
-
Taka Pass
- As soon as you enter Taka Pass talk to the Tea Master and Tea Customer on the left.
- Talk to the merchant next to the Tea Master and Tea Customer and purchase a few of each of the food bags.
- Save at the Origin Mirror to the right of the path.
- Follow the path until you reach a cracked wall on the left. Use the Cherry Bomb technique on the cracked wall to expose a cave opening.
- Enter and walk through the cave until you reach Waka again.
- Defeat Waka by keeping your distance from Waka and using the Power Slash technique on Waka's projectiles then attacking Waka when he is stunned.
- Once Waka is defeated look into the lake on the right and Power Slash a group of bubbles appearing in the lake to reveal a Stray Bead. Swim and pick up the Stray Bead.
- Run up the wooden ramp to the top of the cave, and run all the way through the long cave at the top.
- Exit the cave and follow the path. Use the Bloom technique on three trees along the way.
- At the end of the path you reach a broken bridge. Use the Rejuvinate technique on the broken bridge to repair the bridge.
- On the other side of the bridge use the Bloom technique on the Guardian Sapling.
- Beside the Guardian Sapling feed a group of nightingales seeds.
- Follow the path back towards the cave. Beside the second tree you had to use the Bloom technique are some deer to feed herbs.
- Continue back towards the cave. When you reach the cave feed a group of horses to the right of the entrance of the cave.
- From the horses look towards the sky until you see a trail of Konohana Blossoms. Use the Vine technique on the Kohona Blossoms until you reach a ledge.
- On the ledge dig up and bloom three clovers.
- Continue along the trail of Konohana Blossoms using the Vine technique until you dropped onto a rock with a chest containing a Tiger Statue
- Jump off the rock and follow the path back through the cave and down the ramp.
- At the bottom of the ramp where you defeated Waka feed a group of foxes meat.
- Dig up and use the Bloom technique on a clover near the foxes between the two lakes.
- Leave the cave and head to a Devil Gate straight ahead from the entrance of the cave. Fight a group of Dead Fish and a Bud Ogre inside the Devil Gate.
- Once the Devil Gate is destroyed a tiger returns. Feed the tiger meat.
- Go back onto the path and follow the path until you reach large rock before an intersection. Go behind the large rock and feed a dog meat.
- From the dog, continue behind the rock until you reach a group of mischevous moles in a circle of holes. Stand in the center of holes and dash Moley, the mole wearing blue, three times. After the third time Moley will leave a yellow teacup behind. Bite the yellow teacup to carry it.
- Beside the holes is a group of boar piglets. Feed these boar piglets seeds.
- Take the yellow teacup back to the entrance of Taka Pass to the Tea Master. The Tea Master will trade the teacup for a Golden Mushroom.
- On the right of the Tea Master and the Tea Customer dig up a chest to obtain Glass Beads. The location of the Glass Beads is best seen at night.
- Follow the path back to the junction. Find another dog next to the junction and feed the dog meat.
- At the junction follow the path down a hill to the Cutter's house. Go to the left side of the Cutter's house and dig up a chest next to a mundy lake to obtain a Stray Bead.
- Leave the Cutter's house back to the junction and turn follow the path away from the sign that says "Kusa Village"
- Follow the path and cross a bridge until you reach a fork in the road. Take the path towards the sign that says "To Sasa Sanctuary" and another sign that says "Sasa Gate".
- Feed a group of sparrows beside the Sasa Gate seeds.
- Next to the sparrows use the Bloom technique on two trees.
- Go back to the fork in the road. Wall jump onto a ledge behind the signs at the fork in the road until you reach a sign that says "Mermaid Spring" and a Devil Gate. Enter the Devil Gate and defeat an Ogre Bud and a Yellow Imp.
- Feed a group of dears that appear after you defeat the Devil Gate herbs.
- Use the Bloom technique on a tree to the right of Mermaid Spring beyond a large rock.
- Go back to the fork in the road follow the sign that says "City Checkpoint" on the right of the path spot a group of horses to feed herbs.
- Follow the path until you reach a Devil Gate. Enter the Devil Gate and defeat two Dead Fish and a Yellow Imp.
- Feed a group of deer that appear after you defeat the Devil Gate herbs.
- Cross the path from the deer to dig up a chest to obtain a Stray Bead. The location of the chest is best seen at night.
- Continue away to a path until you reach and talk to Bingo.
- Feed some foxes beside Bingo meat.
- Use the Bloom technique on two trees to the left and the right of Bingo.
- GO back to the junction and follow the sign that says "Kusa Village" up the hill.
- Along the path to Kusa Village feed a group of monkeys Seed, Meat, or Fish.
- Continue along the path until you reach Kusa Village.
- Enter Kusa Village and use the Origin Mirror on the left to save the game.
- Talk to the merchant and purchase the Infinity Judge, Gold Dusts, and Pinwheel. Use the Gold Dust to upgrade your weapons.
- Speak to the villagers in Kusa Village.
- Take the path to the right of the well and the Inn up a mountain and across a bridge until you reach stairs. Climb the stairs and talk to Princess Fuse.
- Fight a Blue Imp and two other imps. You cannot use your Celestial Brush so jump and attack to defeat the Blue Imp while it is in the air.
- Talk to Princess Fuse and obtain the Canine Tracker.
- Look into the lakes on the right and left of Princess Fuse to find two chests. Use the Power Slash technique to open the chests in the water. Obtain a Dragonfly Bead in lake to the right of Princess Fuse and obtain a Lacquerware Set on the left of Princess Fuse.
- Dig up a chest to the left of Princess Fuse's house next to a bridge to obtain a Stray Bead. The location of the chest is best seen at night.
- Follow a path behind Princess Fuse's house towards the Gale Shrine. Dig up a chest to the right of the path leading to the Gale Shring to obtain an Incense Burner. The location of the chest is best seen at night.
- At the Gale Shrine feed a group of monkeys Seeds, Meat, or Fish and dig up and bloom a.
- Head back past Princess Fuse, and down the stairs. At the bottom of the stairs take the path on the left and feed a group of chickens seeds.
- Follow the path and feed a group of sparrows at the end of the path seeds.
- Cross the bridge at the end of the path and use the Vine technique on a path Konohana Blossoms until you land on a platform.
- Feed the monkeys on the platform seeds, meat, or fish.
- Cross the narrow plank away from the platform until you reach Blockhead. Dash at Blockhead to reveal its weak points and use the Celestial Brush to draw dots on its weakpoints to remove it.
- Climb the hill above Blockhead and dig up and bloom a clover.
- Enter the cave Blockhead was guarding and dig up and bloom two clovers and open a chest to obtain a Bull Horn.
- Go back to the stairs that lead to Princess Fuse and follow the path across the bridge until you reach a Konohana Blossom by a ladder. Use the Vine technique on Konohana Blossom to reach a platform.
- Feed a group of chickens on the platform seeds.
- Follow the platform to the end and open a chest to obtain Glass Beads.
- Go to the middle of the platform between the chest and the chickens and wall jump into a cave.
- Go into the cave until you reach Canine Warrior Ko inside. Talk to Canine Warrior Ko and feed Canine Warrior Ko meat.
- Leave the cave and go back down the bridge and down the hill to the villagers, buildings, and well.
- At the bottom of the hill follow the path left and down stairs to a patch of cursed grass. Use the Bloom technique on the grass and reveal Canine Warrior Shin. Feed Canine Warrior Shin meat.
- Follow the path to the left of the Inn and away from the path up the hill to Susano.
- Jump over the fence behind Susano and dig up and bloom a clover.
- Follow the path past Susano until you reach a ladder. Wall jump up the wall to a ledge.
- On the ledge dig up and bloom a clover, feed a group of raccoons seeds, meat, or fish.
- Talk to Kumoso and fight imps and Dead Fishes in under 20 seconds. Use the Cherry Bomb technique to defeat the enemies faster.
- Use the Cherry Bomb technique on a cracked wall to reveal a cave with Canine Warrior Rei. Feed Canine Warrior Rei meat.
- Drop down the ledge and back onto the path past Susano. Feed a group of sparrows on the left seeds.
- Follow the path down the hill until you reach Mr. Bamboo's house. Go to the left of Mr. Bamboo's house and use the Power Slash technique on highlighted bamboo tree to revel Canine Warrior Chi. Feed Canine Warrior Chi meat.
- Enter Mr. Bamboo's house and dig up a buried chest by the door to obtain a Stray Bead. The location of the chest is best seen at night.
- Follow the path away from Mr. Bamboo's house past Susano back to the villagers, buildings, and well.
- Go between two houses to a garden with pigs. Feed the pigs seeds.
- Enter the Inn and and draw a dot to make an eye on the statue on the right to obtain an Exorcism Slip S.
- Go to the second floor. Dash the door between the two rooms to talk to Haruka. Leave the Inn and reenter the Inn. Go back to the second floor to Haruka in the room to the right. Dash the doors to the room to enter and talk to Haruke to obtain the Taka Pass Wanted List.
- Exit the Inn and head back to Princess Fuse's.
- At Princess Fuse's encounter Canine Warrior Tei. Keep your distance from Canine Warrior Tei. When a light appears on Canine Warrior Tei it begins its attack after it completes an attack use your Devout Beads to attack Canine Warrior Tei. When Canine Warrior Tei loses his color and turns black and white use the Power Slash technique or the Cherry Bomb technique.
- After Canine Warrior Tei is defeated head back to Taka Pass.
-
Missing 3 Canine Warriors
- When you enter Taka Pass head back to the Tea Customer next to the Merchant and Tea Master and give him the Pinwheel you bought from the merchant in Kusa Village.
- Wait until night if it is still day time. While you wait you can talk to Moley the leader of the moles and try to attack him three times to obtain a Vase.
- At night time head to the Cutters' house next to the moles.
- Use the Vine technique on a Konohana Blossom above the Cutters' house to reach a chest containing Glass Beads.
- Drop down off the roof behind the Cutters' house and climb a log onto a ledge of the house. Use the Cherry Bomb technique on wood covered part of the ledge to reveal an entrance.
- Enter the Cutters' house and bite Mrs. Cutter by holding the C button and drag her into the light to reveal her shadow.
- Fight the Cutters as two Crow Tengus. When they begin to fly use the Power Slash technique to remove their wings. When they are on the ground the Crow Tengus tends to block attacks so use the Cherry Bomb technique to stun them and remove their color so they appear black and white. When they lose their color use the Power Slash technique to damage them.
- After you defeat the Cutters you free and talk to Chun of the Sparrow Tribe.
- Take Chun through Sasa Gate and into Sasa Sanctuary.
- Follow the path through Sasa Gate until you reach Sasa Sanctuary and return Chun,
- Dig up a chest to the left of the entrance to Sasa Sanctuaty to obtain a Stray Bead.
- Save the game at the Origin Mirror beside the path leading to Sasa Sanctuary.
- Wall Jump up two ledges next to the Origin and dig up and bloom a clover.
- Enter the gates to the sanctuary and feed two groups sparrows, one to the right of the entrance and another to the left of the entrance.
- Enter the sactuary and go behind the stairs to a group of mice. Feed the mice seeds, meat, or fish.
- Climb up the stairs and take the set of stairs to the left.
- Enter the first door at the top of the stairs and talk to the Merchant to buy food.
- Use the Celestrial Brush to draw an eye on the statue behind the Merchant.
- Exit the room and enter the room next door. Feed the mice seeds, meat, or fish and use the Power Slash technique on the giant watermelon.
- Exit the room and head back and cross the stairs to the other side of the room. Enter the two rooms and collect some food.
- Head back to the stairs and enter the elevator between the set of stairs leading to the left and right side of the room.
- Open up ten chests where the elevator drops you off to obtain Glass Beads, Traveler's Charm, Wooden Bear, Holy Bone S, Coral Fragment, Exorcism Slip S, Vase, Steel Fist Sake, Dragonfly Bead, and Steel Soul Sake.
- Talk to Jamba and then leave the room down the elevator
- Go down to the first floor and head down a hallway to the right of the entrance into Sasa Sanctuary to the hot springs.
- Speak to the Bath Attendant until Mr. Bamboo arrives. Agree to help Mr. Bamboo.
- Lead Mr. Bamboo to the bottom of the hot springs in under three minutes by digging through the blocks of dirt and avoiding blocks covered in spikes. Use the Bloom technique to obtain additional time.
- After you help Mr. Bamboo and the Bath Attendant draw in three stars in the constellaion to obtain the Waterspout technique from Nuregami.
- Use the Waterspout technique on the Bath Attendant and on the hot spring to reach a ledge.
- On the ledge dig up and bloom a clover.
- Dig up a chest next to the large bamboo switch to obtain a Lacquerware Set. The location of the chest is best seen at night.
- Use the Waterspout technique on the opening of the large bamboo switch to open up a hallway.
- Follow the hall to stairs leading up a hill and feed sparrows at the top of the first set of stairs seeds.
- Climb the second set of stairs up the hill and feed another group of sparrows seeds.
- Next to the sparrows talk to Tai.
- Dig up a chest besides the stairs leading to Tai to obtain Incense Burner. The location of the chest is best seen at night.
- Continue uphill and feed tigers, to the left of the path, meat.
- At the top of the hill head left to another group of tigers and feed them meat.
- Head past the bamboo until you reach a group of hares. Feed the hares herbs.
- Dig up a chest to the left and right of the hares to obtain a Stray Bead and a Golden Peach.
- Go back to the bamboo and use the Power Slash technique on the glowing bamboo to reveal Canine Warrior Gi.
- Choose to fight with Canine Warrior Gi. Keep your distance from Canine Warrior Gi and wait for Gi to attack and counter attack Gi with the Devout Beads until you defeat Canine Warrior Gi.
- Talk to Canine Warrior Gi and receive a Duty Orb.
- Feed Canine Warrior Gi meat.
- Head back to the hot spring and talk to Mr. Bamboo and receive a Mermaid Coin.
- Leave Sasa Sanctuary and back into Taka Pass.
- Go back to the Cutters' house and use the Waterspout technique in the lake beside their house to reach a ledge. Dig up and bloom a clover on the ledge.
- Leave Taka Pass and back to Agata Forest.
- Enter Agata Forest and follow the path up a hill beside the Merchant to Hitoshi Spring.
- Talk to Kushi and use the Waterspout technique to move the water from Hitoshi Spring to Kushi's barrel.
- Help Susano defeat imps by using the Power Slash technique after Susano attacks the imps.
- Leave Hitoshi Spring and enter the cave leading to Madame Fawn's house.
- Use the Waterspout technique on the three chests outside of Madame Fawn's house that are on fire to obtain a Holy Bone M, a Bull Horn, and a Stray Bead.
- Use the Waterspout technique in the lake infront of Madame Fawn's house then jump and dash to reach a ledge with a chest containing a Lacquerware Set.
- Go to the Origin Mirror and save the game.
- Exit the cave and follow the Canine Tracker to the island where you first met and fished with Kokari.
- Talk to Kokari and help Kokari catch two fish and then a Whopper.
- Draw in three missing stars in the constellation and obtain the Crescent technique from Yumigami. Then use the Crescent technique in the sky.
- Fight with Canine Warrior Jin. Keep your distance from Canine Warrior Jin and counter attack with Devout Beads after Jin digs a hole in the ground, plants a yellow mine, or flashes and attacks.
- After Canine Warrior Jin is defeated receive the Justice Orb.
- Leave Agata Forest and into Shinshu Field.
- Use the Crescent technique in the sky if it is not already night time. Fight all the Demon Scrolls to obtain Yenand to complete the Wanted List.
- After the Wanted List is complete go to Priest Mika in the Moon Shrine to receive Gold Dust.
- Go to the dojo and talk to Onigiri Sensei to obtain the Rosary Technique: Spirit Storm for 7000 Yen.
- Talk to Ida running along the path and choose to race him. To defeat Ida catch him and hit him with you dash attack.
- Talk to the Nameless Man beside his kiln and receive his Azure Neck vase.
- Bite the Azure Neck vase and follow the path up the hill towards top of the hill until you reach a cracked wall that you previously used the Cherry Bomb technique on. Offer the vase to a Guardian Statue inside the cave.
- Use the Crescent technique and the Sunrise technique to make the day pass and talk to the Nameless Man again to receive his Indigo Neck vase.
- Bite the Indigo Neck vase and follow the path away from the Nameless Man's house towards Kamiki Village until you reach a Guardian Statue on the left of the path. Offer the vase to the Guardian Statue.
- Use the Crescent technique and the Sunrise technique to make the day pass and talk to the Nameless Man again to receive his Rust Neck vase.
- Bite the Rust Neck vase and follow the path up the mountain towards the dojo until you reach a Guardian Statue. Offer the vase to the Guardian Statue.
- Go to Kamiki Village
- Enter Kamiki Village, past the Origin Mirror, and towards the river to a Konohana Blossom in the sky.
- Use the Vine technique on the Konohana Blossom to reach a ledge with a clover to dig up and bloom.
- Use the Vine technique on a higher Konohana Blossom to reach a path with a chest at the end of the path. Open the chest to obtain a Stray Bead.
- Use the Crescent technique in the sky if it is not already night time and talk to Canine Warrior Chu. Choose to fight Canine Warrior Chu.Keep your distance from Canine Warrior Chu and counter attack with your Devout Beads after Chu digs a hole in the ground, plants a yellow mine, or flashes and attacks until Chu is defeated.
- Receive the Loyalty Orb from Canine Warrior Chu after you have defeated him.
- Return to the Guardian Sapling from the start of the game and use the Power Slash technique on two fruit to obtain a Golden Peach and a Crystal.
- Head back to Kusa Village.
-
Crimson Helm
- Enter Kusa Village and return to Princess Fuse's house.
- Speak to Princess Fuse and receive the eight Satomi Power Orbs.
- Feed Canine Warrior Tei meat.
- Follow the path to the entrance of the Gale Shrine and talk to Susano and Yatsu to gain entrance into Gale Shrine.
- Follow the path into the Gale Shrine until you reach a lake.
- Use the Power Slash technique on three chests in the lake to obtain a Holy Bone S, a Dragonfly Bead, and a Bull Horn.
- Follow the path on the right until you reach a Devil Gate.
- Enter the Devil Gate and fight a Chimera. Defeat the Chimera by attacking the Chimera until it loses its color then use the Power Slash or Cherry Bomb technique.
- Bite the Exercising Arrow and follow the path back to the lake and take the path across from the entrance into the Gale Shrine.
- Follow the path past two windmills and open a locked door at the end of the path.
- Use the Origin Mirror beside the door and save the game.
- Enter the elevator but do not stand on the elevator platform. Use the Cherry Bomb technique on the elevator platform to lift the platfom to the second floor.
- Once the elevator platform is lifted to the second floor enter a room beneath the elevator platform.
- In the room beneath the elevator feed a group of mice seeds, meat, or fish, dig up and bloom two clovers, and open three chest to obtain a Holy Bone S, a Rabbit Statue, and a Stray Bead.
- Return to the elevator through the light in the center of the room.
- Stand on the elevator platform and use the Cherry Bomb technique to lift the platform to the second floor.
- Defeat the Demon Scroll containing a Chimera and bite the Exercising Arrow after the Chimera is defeated.
- Return to the elevator platform and use the Cherry Bomb technique to lift the platform to the third floor.
- Exit on the third floor and use the Exercising Arrow on the locked door.
- Climb the stairs on the third floor until you reach the black wind.
- Use the Celestial Brush to draw wind in the opposite direction of the black wind to allow the Divine Wind to blow.
- When the constellation appears draw in three stars and receive the Galestorm technique from Kazegami.
- Use the Galestorm technique on the small windmill.
- Enter the hallway into the large windmill until you reach stairs.
- Jump to another hallway above the stairs to a chest containing a Sun Fragment.
- Go down the stairs back to the elevator. Use the Galestorm technique on the chest next to the elevator to obtain the Gale Shrine Map.
- Enter the elevator and return to the second floor. Use the Malestorm technique on a chest on the balcony of the second floor to obtain a Stray Bead.
- Return to the first floor and use the Galestorm technique on the windmill outside the elevator to move the bridge with the two windmills.
- Follow the bridge to a chest contraining Travel Guide: Brush Tips.
- Continue along the hallway to reach another chest. Use the Galestorm technique on the chest to obtain a Pearl.
- Use the Vine technique on a Konohana Blossom above to reach a beam with a flaming chest. Use the Galestorm technique on the chest to receive a Lacquerware Set.
- Use the Vine technique on another Konohana Blossom to reach a beam with a chest containing a Steel Soul Sake.
- Use the Vine technique on one more Konohana Blossom to reach a beam with a flaming chest. Use the Galestorm technique on the chest to receive a Inkfinity Stone.
- Walk away from the chest along the beam to a group of mice. Feed the mice seeds, meat or fish.
- Jump down from the beam and use the Vine technique to retrn to the first Konohana Blossom above the floor.
- Use the Vine technique on a Konohana Blossom away from the chests you previously opened to reach a beam next to banners.
- Use the Galestorm technique on the banners to lift the banners. Use the bannners as platform to reach the beam on the other side.
- open the chest on the beam to obtain a Wooden Bear.
- Use the Galestorm technique on another set of banners to reach another beam with a chest.
- Open the chest on this beam to obtain Exorcism Slip S.
- Jump off the beam onto a ledge with a group of mice and an Origin Mirror. Feed the mice seeds, meat or fish and use the Origin Mirror to save the game.
- Enter a hallway and use the Galestorm technique to put out the flames in the hallway and proceed through the hallway and door.
- Fight and defeat Crimson Helm by circling around him and attacking his back side until his armor is removed. Once his armor is removed use the Galestorm technique to remove the flames from his body. Then attack Crimson Helm with the Power Slash or Cherry Bomb technique. When his armor returns circle Crimson Helm and repeat the attacking process until he is defeated.
- When Susano returns follow his attacks with the Power Slash technique and use the Galestorm technique on Susano to aid his final attack.
- Receive the Divine Instrument: Life Beads and save the game when asked.
-
-
Moon Festival
- Talk to the Villgers of Kamiki Village in the Village, on the sacred deck, and the Guardian Sapling.
- Leave Kamiki Village and head to the City Checkpoint next to Taka Pass.
-
To the Capital
- Use the Origin Mirror on the left of the path to save the game.
- Feed a group of nightingales, on the right of the path seeds.
- Talk to the merchant next the bridge to purchase supplies.
- Dig up and open a chest behind the merchant to obtain a Bull Horn. The location of the chest is best seen at night.
- Use the bloom technique on a cursed tree on the left of the path next to a well.
- Go down a ramp to the left of the bridge. Underneath the ramp open up a chest to obtain Travel Guide: Mother Tree.
- Continue going down until you reach the river. Follow the river to some boar piglets and feed them seeds.
- Continue along the river until you reach a waterfall. Go into a cave behind the waterfall and dig up and bloom a clover.
- Exit the cave, and continue along the river until you reach a chest on fire. Use the Waterspout or Galestorm technique on the chest and open it to obtain a Stray Bead.
- Follow the river until you reach raccoons. Feed the raccoons seeds, meat, or fish.
- Dig up and open burried chest next to the raccoons to obtain a Exorcism Slip S. The location of the chest is best seen at night.
- Continue along the river and dig up and open a chest to obtain a Stray Bead. The location of the chest is best seen at night.
- When the strip of land ends dig up and bloom a clover.
- Return back to the drawbrige and speak to Yoichi.
- Use the Inferno technique to light Yoichi's arrows on fire with the flames of the phoenix statue and lower the bridge.
- Use the Vine technique on a path Konohana Blossoms starting at the center of the bridge.
- After the fifth Konohana Blossom drop to a small island with a chest. Open the chest to obtain a Dragon Statue.
- Use an Inkfinity Stone and use the Vine technique to continue on the path of Konohana Blossoms. At the end drop onto another island and open a chest to obtain a Stray Bead.
- Go back to the drawbridge and cross it.
- Use the Bloom technique on two groups of cursed grass to the right of the bridge.
- Feed a group of nightingales seeds.
- Dig up and bloom a clover.
- Use the Bloom technique on two groups of cursed grass to the left of the bridge.
- Feed a group of horses herbs.
- Dig up a buried chest near the horses to obtain a Stray Bead. The location of the chest is best seen at night.
- Continue to Ryoshima Coast.
- Use the Origin Mirror on the left of the path and save the game.
- Take the path on the right at the fork and follow the sign to Ankoku Temple.
- Continue on the dirt path and encounter a Headless Guardian.
- Take the path on the left at the fork and use the Cherry Bomb technique on the cracked wall at the dead end.
- Wall jump to a higher level and use the Waterspout technique to fill up the lake on the higher level.
- Wall jump and and use the Waterspout technique on two more levels to fill up to more lakes and provide water to a Guardian Sapling.
- Use the Bloom technique on the Guardian Sapling.
- Feed the nightingales next to the bloomed Guardian Sapling seeds.
- Return to the first level and exit the cave.
- Follow the path and feed some cows on the right of the path herbs.
- Take a left at the fork to the entrance of a cave and dig up and bloom a clover. Turn around and return to the path towards Ankoku Temple and do not enter the cave.
- Take the stone path on the right to the Entrance of Ankoku Temple.
- Climb the stairs and enter Ankoku Temple.
- Open a chest to obtain an Incense Burner on the right and exit Ankoku Temple.
- Feed a cat, on a ledge to the right of the entrance to Ankoku Temple, fish.
- Dig up and open a chest behind Ankoku Temple to obtain a Vase. The location of the chest is best seen at night.
- Go down the stairs and feed some foxes, at the bottom of the stairs, meat.
- Ring the bell infront of Ankoku Temple by jumping and dashing the bell until you obtain a Holy Bone S, Holy Bone M, and Holy Bone L.
- Return to the Origin Mirror and feed a group of dogs by the mirror, meat.
- Take the path on the left at the fork and follow the sign to Sei-An City.
- Speak to the Fisherman along the path.
- Turn left to on the path towards a high platform and feed some foxes along the path, meat.
- At the end of the path dig up and bloom a clover.
- Return to the main path towards Sei-An City and feed a group of hares to the right of the path, herbs.
- Talk to the merchant at the end of the path and next to the beach.
- Turn left from the path and the merchant and feed a group of monkeys on the beach, seeds, meat, or fish.
- Use the Power Slash technique on a clam next to a power spring when the beach ends to obtain Glass Beads.
- Turn around and follow along the beach. Use the Power Slash technique on a clam in the water past the merchant.
- Continue along the beach and use the Bloom technique on three patches of cursed grass.
- Feed two groups of boar piglets seeds and a group of pigs seeds that appear after you restore the grass.
- Use the Water Lily technique in the water to reach an island in the water.
- Open a chest on the island to obtain an Exorsicm Slip S.
- Feed a group of monkeys on the island , seeds, meat, or fish.
- Enter the Dojo and purchase the Holy Eagle and Digging Champ from Onigiri Sensei. Receive a Holy Bone M after mastering each technique.
- Exit the Dojo and dig up and open a chest in hard ground to obtain a Stray Bead.
- Jump up a high platform infront of the Dojo with the Holy Eagle to obtain a Crystal.
- Leave the island and use the Water Lily technique to return to the mainland.
- Continue along the beach towards a pier and use the Power Slash technique on three clams along the beach in the water to obtain a Coral Fragment, a Traveler's Charm, and a Dragonfly Bead.
- Talk to Animal Lover along the beach by the pier.
- Dig up and open a chest beside the ramp up onto the pier to obtain a Crystal.
- Go to the end of the pier, towards the water, and open a chest to obtain a Dragonfly Bead and feed a group of cats fish.
- Turn around and continue along the pier until you encounter Ubume. Defeat Ubume by attacking to make Ubume block with an umberlla then use the Galestorm technique to expose Ubume. Attack and damage Ubume after you use the Galestorm technique.
- Continue towards the gate to Sei-An City and follow the path to the left of the gate until you reach a Devil Gate.
- Enter the Devil Gate and defeat the enemies in the gate to reveal a Mermaid Spring.
- Feed a group of horses by the Mermaid Spring, herbs.
- Return to the gate to Sei-An City and open a chest next to the gate to obtain a Steel Fist Sake.
- Enter a Devil Gate to the right of the gate to Sei-An City and defeat the enemies inside.
- Feed a group of hares and a single black eared hare that appear after you remove the Devil Gate, herbs
- Dig up and open a chest by the hares to obtain a Vengeance Slip. The location of the chest is best seen at night.
- Bite the black eared hare and take him to Animal Lover to obtain a Stray Bead.
- Enter through the gate to Sei-An City and turn right to a ledge. Dig up and bloom a clover on the ledge.
- Go down another path on the right to a lower ledge and feed a group of cows herbs.
- Dig up and open a chest next to the cows to obtain a Crystal. The location of the chest is best seen at night.
- Follow the path into Sei-An City.
-
Capital Under Misty Siege
- Use the Origin Mirror to the right of the entrance in Sei-an City.
- Talk to the Tool Dealer in his stand on the left and purchase the Blinding Snow, Marlin Rod, Herbal Medicine, and Charcoal.
- Open a chest to obtain a Vase, behind the Tool Dealer's stand to the left of the entrance in the city.
- Talk to the Weapon Dealer in his stand on the right across from the Tool Dealer and purchase two Gold Dusts and Seven Strike.
- Head to the right side of the town and follow the path to a Carpenter's house. Dig up and open a chest infront of the house, to obtain an Inkfinity Stone. The location of the chest is best seen at night.
- Open a chest behind the Carpenter's house to obtain an Exorcism Slip L.
- Continue to follow the path past the Carpenter's house and to Mr. Flower's house. Dig up and open a chest behind Mr. Flower's house to obtain a Crystal. The location of the chest is best seen at night.
- Return to the entrance of the city and follow the path directly infront of the entrance. Dig up and open a chest beside stairs with a city dweller, leading into the canal, and before you cross the bridge, to obtain an Exorcism Slip M. The location of the chest is best seen at night.
- Follow the stairs into the canal and open 10 chests within the canal to obtain a Stray Bead, Steel Fist Sake, Vengeance Slip, Inscence Burner, Exorcism Slip S, Bull Horn, Coral Fragment, Steel Soul Sake, Mermaid Coin, and Laquerware Set.
- Talk to Naguri in the far left end of the town and agree to help him. Lead Naguri to the bottom in another digging mini-game.
- Use the Water Lily technique in the canal and return to the center area of the town, cross the bridge, and enter the next section of Sei-an City.
- Cross the bridge and talk to Benkei in the center section of the bridge.
- Hand over the Blinding Snow and help Benkei catch the Living Sword though another fishing mini-game.
- Cross over the rest of the bridge and talk to Waka at the end.
- Continue past Waka and enter the building directly behind him with a line of people at the entrance.
- In the building talk to Rao. Use a Celestrial Brush technique when asked by Rao during your conversation with her.
- Open the chests to the left and right of Rao to obtain an Exorcism Slip M and Travel Guide: Land of the Gods
- Exit the building through the door behind Rao.
- Talk to Komuso on the left next to a tree. Defeat an Ubume and a Tengu within 30 seconds to obtain a Stray Bead from Komuso.
- Outside the building with Rao turn right and dig up and open a chest around the corner, to obtain a Crystal.
- Dig up and open a chest within the walls of Okuni's house on the right of the entrance, to obtain a Pearl. The loaction of the chest is best seen at night.
- Enter Okuni's house and open the chest inside to obtain a Holy Bone S.
- Exit the house and cross the bridge infront of the entrance.
- Turn left after crossing the bridge to a tall building and dig up and open a chest behind the tall building to obtain a Exorcism Slip L. The loaction of the chest is best seen at night.
- Follow the path to the second bridge and dig up and open a chest to the right of the bridge to obtain a Stray Bead. The loaction of the chest is best seen at night.
- Look into the canal to the right of the bridge and use the Power Slash technique on a chest in the water to obtain an Incense Burner
- Cross the bridge, go to the house across the bridge, and dig up and open a chest within the walls on the right side of the house to obtain a Crystal. The loaction of the chest is best seen at night.
- Open a chest on the left side of the house to obtain an Exorcism Slip s.
- Enter the house and open a chest to obtain a Steel Soul Sake.
- Exit the house and follow the path to the building with green mist.
- Go to the right side of the building to Rao's Prayer Slips.
- Bite Rao's Prayer Slips and return them to Rao.
- Agree to help Rao and return to Ryoshima Coast.
- Head towards the other end of the beach until you reach a power spring in the water.
- Use the Waterpout technique on the power spring and take it to a high platform.
- Holy Eagle onto the high platform and use the Crescent technique above the sunken ship.
- Jump into the water and towards the sunken ship.
- Dig up and open two clams to obtain an Exorcism Slip M and Glass Beads.
- Run under the ship and to the other side of the ship and dig up and open a clam to obtain a Godly Charm.
- Go back to the other side of the ship and jump up past the entrance into the ship and onto the deck of the ship.
- Walk up a fallen mast and onto a platform with two chests. Open the two chest to obtain a Stray Bead and a Golden Peach.
- Jump back down from the deck of the ship and back to the entrance into the ship. Enter the sunken ship.
- Use the Celestial Brush to draw a line from Rao's Prayer Slips to the sealed door to remove the seal.
- Use the Origin Mirror by the door to save the game.
- Go through the door and use the Prayer Slips to eliminate three ghosts for demon fangs.
- Climb up the stairs into a room.
- Jump down into the room and open three chests in the room to obtain a Bull Horn, Holy Bone M, and a Travel Guide: Celestial Envoy.
- Use the Prayer Slips to defeat the enemies in the other two chests.
- Run up stairs into a long hallway with spikes in the floor and into another room.
- Fight and defeat Jiro and Suburo in this room by using the Cherry Bomb technique on both Jiro and Suburo.
- Enter another hallway and through a Golden Gate. At the end of the hallway use a Prayer Slip to remove the seal from a door.
- Enter a new room and dig up and bloom a clover in the corner.
- Use the Sunrise technique in the sky to fill the ship with water.
- Run back through the hallway and back into the room where you fought Jiro and Suburo. Fight and defeat Ichiro by using the Cherry Bomb technique on Ichiro.
- Swim back to the room with the five treasure chests and follow a path of floating platforms to a floating barrel.
- Jump onto a platform above the floating barrel and open a chest with a Holy Bone S.
- Head through a Golden Gate and jump down into the water and go through a hallway in the corner of the room past a cannon.
- Use the Prayer Slips on the ghosts in the hallway to obtain Demon Fangs.
- Continue through the hallway and jump onto a ledge and open a chest to obtain a Stray Bead.
- Continue through the hallway and jump onto another ledge and open another chest to obtain a Crystal.
- Enter a large room with an enemy with giant hands and swim to a ramp on the left. Climb up the ramp and follow a path to a rope with a barrel.
- Use the Power Slash technique to cut the rope and drop the barrel.
- Run on the barrel to move the barrel to a hook.
- Holy Eagle to a ledge above the hook and open a chest to obtain a Monkey Statue.
- Swim back to the path and follow the path across the room avoiding the giant hands of the enemy.
- Drop back into the room where you used the Sunrise technique. Use the Crescent technique in the sky this time and remove the water.
- Use the barrel and jump back up to the previous path and back into the previous room with the enemy with giant hands.
- Drop into the area you rolled the barrel onto the hook. Roll spiked barrels over the enemy until you receive praise.
- Exit the room through the other hallway and return to the room with the cannon.
- Use the Cherry Bomb technique on the cannon to remove three doors, Aim the cannon by standing on the end of the cannon.
- Open a chest in the top room to obtain a Sun Fragment and a chest in the middle room to obtain a Pearl.
- Bite an Exercising Arrow in the lower room and take it to the locked door on the other side of the room.
- Go up the stairs and use the Prayer Slips to remove the seal from the door at the top of the stairs.
- Enter the room and open three chests to obtain a Lacquerware Set, Stray Bead, and a Lucky Mallet.
- Use the Prayer Slips to defeat the enemies in the other two chests.
- Exit the room and the sunken ship.
- Once out of the sunken ship and on the beach follow the Lucky Mallet to Sei-an City and into the Imperial Palace.
- Use the Celestial Brush to draw a line from Issun to a chained box to remove the chains.
- Follow the path to an Origin Mirror and save at the Origin Mirror.
- Go through a door on the right with a Blocking Spider above it.
- Pass a large foot and jump on a couple of platforms until you reach Kaguya.
- Follow the platforms and use Issun to open a chained box to obtain a Godly Charm and open and open a chest to obtain a Traveler's Charm.
- Continue along the path and fight a Thunder God Mirror.
- Go through another door with a Blocking Spider above it then go through a Golden Gate and into a room with giants sweeping the floor.
- Jump onto a small ledge in the wall and use the Cherry Bomb technique on the cracked wall to reveal a room with a chest. Open the chest to obtain an Exorcism Slip S.
- Return to the room with the giants and use the giants feet as a platform to jump to a ledge on the opposite wall.
- Use the Cherry Bomb technique on the cracked wall to reveal a room with a chest. Open the chest to obtain an Golden Peach.
- Bite an Exercising Arrow on the ledge and return back to the hallway with the Origin Mirror past Kaguya.
- Unlock the door in the hallway with the Exercising Arrow and enter room.
- Use the Cherry Bomb technique on the cracked ground to create a hole. Jump into the hole to enter another room.
- Jump from the ledge you land on to the bottom of the room.
- Use the Cherry Bomb technique on the cracked wall of the box you jumped from and enter the large box.
- Use the Power Slash technique on a rope suspending a flask.
- Enter the flask and use the Galestorm technique in the flask to blow the mist from the flask.
- Fill in four stars of the constellation and receive the Veil of Mist technique from Kasugami. Draw two lines to use the Veil of Mist technique.
- Use the Veil of Mist technique at the Blocking Spider to pass the spider and exit the box.
- Fight a Wind Doom Mirror once you exit the box. Use the Veil of Mist technique to slow down the Wind Doom Mirror and defeat it.
- Follow a path of acorns to a mushroom. Climb the mushroom platforms and onto a yellow Platform Spider.
- Jump off the spider and onto a platform with a clover to dig up and bloom.
- Pass the clover and use Issun to open a chained box to obtain a Steel Fist Sake behind a spider web.
- Jump onto a red Platform Spider by the clover and ride it to a yellow Platform Spider. Jump off the yellow Platform Spider and onto a ledge with a clover to dig up and bloom.
- Return to the mushroom and the path of acorns. Follow the acorns to another red Platform Spider.
- Ride the red Platform Spider up to a ledge with a clover to dig up and bloom.
- Exit the room by stepping onto the light where you first entered the room.
- Return to the room with giants sweeping the floor. Use the Veil of Mist technique to pass the Blocking Spiders.
- In the room with the giants use the Veil of Mist technique to pass the sweeping giants.
- Go through another Golden Gate and into another room.
- Follow the path and use Issun to open a chained box to obtain an Inkfinity Stone in the water.
- Use the Waterspout technique on a line of bamboos and use them as a bridge to reach a red Platform Spider.
- Jump off the red Platform Spider and into a room with two Demon Scrolls. Defeat the Demon Scrolls and obtain a Holy Bone M and an Inkfinity Stone.
- Jump onto a series of red Platform Spiders above the room and onto a platform.
- Follow the path through a Golden Gate and onto wooden beams with hanging Blocking Spiders above the room. Use the Veil of Mist technique to pass the Blocking Spiders.
- Go straight past a Blocking Spider and turn right to the end of the beam. Open a chest at the end of the beam to obtain an Imperial Palace Map.
- Turn around and then turn right to then left to a chained box behind a spider web. Use Issun to open the chained box to obtain an Exorcism Slip M.
- Head back towards the Golden Gate and take the follow the wooden beam on the right near the Golden Gate.
- Use the Veil of Mist technique to cross blue Platform Spiders turn right and follow the beam to the end to a chained box behind a spider web. Use Issun to open the chained box to obtain an Vengeance Slip.
- Turn around then turn left onto a beam with three Blocking Spiders. Use the Veil of Mist technique to pass the Blocking Spiders.
- At the end of the path jump into the mouth of the emperor.
- Inside the emperor follow the path in his body to an Origin Mirror and save the game at the Origin Mirror.
- Continue inside the emperor's body and jump down to fight Blight. Defeat Blight by using the Veil of Mist technique when Blight yells. If he charges get behind him and attack his back. If Blight surrounds himself with swords use the Power Slash technique on the glowing sword and dodge the remaining swords then attack the glowing sword when it lands on the ground.
- Obtain Exorcism Beads after you defeat Blight.
- Guide the emperor's body across the bridge and free Kaguya.
- Exit the emperor's body and talk to the emperor.
- Purchase the Fog Pot from the emperor and open the chest to obtain a Travel Guide: Veil of Mist.
- Open the chest behind the emperor to obtain a Rooster Statue.
- Exit the room and dig up and open five chests to obtain a Stray Bead, Lacquerware Set, Bull Horn, Pearl, and Crystal. The location of the chests are best seen at night.
- Exit the Imperial Palace.
-
Kaguya's Memories
- Talk to Kaguya ouside the Emperor's palace.
- Turn left from the Emperors palace and follow the canal. Use the Power Slash technique to open a chest in the canal to obtain a Lacquerware Set.
- Use the Bloom technique on two trees by the canal.
-
Himiko, Queen of Nippon
- Head to the corner of the Aristocratic Quarter between the Emperor's palace and Queen Himiko's palace to a Mermaid Spring. Dig up and bloom a clover by the Mermaid Spring.
- Use the Bloom technique on 3 trees by the Mermaid Spring.
- Cross the bridge and pass the entrance to Himiko's palace. Use the Bloom technique on two trees at the entrance to Himiko's palace.
- Go to the corner Aristocratic Quarter on the opposite side of Queen Himiko's palace and use the Bloom technique on four trees.
- In the corner dig up and bloom a clover.
- Cross the bridge to the area by Komuso and use the Bloom technique on three trees by the entrance into the Aristocratic Quarter.
- Head to the canal behind Komuso and use the Power Slash technique on a chest in the canal to obtain an Exorcism Slip L.
- Open a chest to the right of the entrance to the Aristocratic Quarter to obtain an Inkfinity Stone.
- Dig up and open a chest by the Canal to obtain a Golden Peach. The location of the chest is best seen at night.
- Jump over the canal and dig up and bloom a clover,
- Go to Himiko's palace and use the Veil of Mist technique to get past the guards at the gate.
- Dig up and open a chest to the right of the gate to obtain a Sheep Statue. The location of the chest is best seen at night.
- Climb the stairs to the entrance of Himiko's Palace and turn right down stairs and into a small room.
- Open a three chests in the room to obtain a Pearl, a Bull Horn, and a Travel Guide: Northern Land.
- Exit the room, jump down off the right side of the walkway and dig up and bloom a clover.
- Return to the entrance and enter the room to the left of the entrance.
- Open a chest to obtain a crystal
- use the Celestial Brush to draw a missing eye on a statue to obtain a Godly Charm
- Exit the room, jump down off the left side of the walkway and open a chest to obtain a Stray Bead.
- Return to the entrance and open a chest behind the entrance to obtain a Holy Bone M.
- Enter Himiko's palace and go behind the elevator to a chest. Open the chest to obtain a Stray Bead.
- Enter the elevator and take it to the top floor and talk to Issun.
- Leave Himiko's palace and head to the Commoner's Quarter.
- On the bridge connecting the Aristocratic Quarter and the Commoner's Quarter jump into the water on the right side of the bridge from Rao's building. Use the Power Slash technique on a chest in the water by the barrier on the right side of the bridge to obtain a Stray Bead.
- Turn left when you enter the Commoner's Quater and enter the Restaurant during the day.
- Go to the kitchen in the Restaurant and talk to and offer the Golden Mushroom to Yama.
- Use the Fireburst technique, by drawing the symbol on the back wall of the kitchen, in the stove to receive the Fireburst technique from Moegani.
- Open the chest after you receive the Fireburst technique to obtain Travel Guide: Inferno Tech.
- Exit the Restaurant and use the Crescent technique in the sky and enter the Restaurant again at night.
- Talk to Masu at the table next to the kitchen to obtain Masu's monster manifest.
- Exit the kitchen and dig up and open a chest behind the restaurant to obtain a crystal. The location of the chest is best seen at night.
- Head to the corner of the Commoner's Quater between the entrance into Sei-an City and the Carpenter's house to an empty pond. Use the Waterpout technique to fill the empty pond.
- Use the the Waterspout technique on a power spring in the pond and take the power spring to the Tao Trooper Headquarters.
- Open a chest behind the Tao Trooper Headquarters to obtain a Horse Statue.
- Jump back down to Commoner's Quarter and follow the path to a City Dweller drawing on the ground. Offer the City Dweller the Charcoal.
- Talk to the City Dweller and see the Star Pattern as you talk to her.
- Head to the other side of the city and to the Kimono Shop across the bridge.
- Open a chest behind the Kimono Shop to obtain a Traveler's Charm.
- Enter the Kimono Shop and dig up and open a chest to obtain a Crystal. The location of the chest is best seen at night.
- Enter the back room of the Kimono Shop and talk to Mr. Chic.
- Use the Celestial Brush to draw the Star Pattern on the kimono on the back wall until Mr. Chic says "something happen" and the music changes.
- Return to and talk to the City Dweller drawing on the ground again and see the Love Pattern as you talk to her.
- Return to the Kimono Shop, talk to Mr. Chic and use the Celestial Brush to draw the Love Pattern on the kimono on the back wall until Mr. Chic says "something happen" and the music changes.
- Return to and talk to the City Dweller drawing on the ground again and see the Henshin Pattern as you talk to her.
- Return to the Kimono Shop, talk to Mr. Chic and use the Celestial Brush to draw the Henshin Pattern on the kimono on the back wall until Mr. Chic says "something happen" and the music changes.
- Return to and talk to the City Dweller drawing on the ground again and see the Happiness Pattern as you talk to her.
- Return to the Kimono Shop, talk to Mr. Chic and use the Celestial Brush to draw the Happiness Pattern on the kimono on the back wall until Mr. Chic says "something happen" and the music changes.
- Return to and talk to the City Dweller drawing on the ground again and see the character that represents God Pattern as you talk to her.
- Return to the Kimono Shop, talk to Mr. Chic and use the Celestial Brush to draw the character that represents GodPattern on the kimono on the back wall until Mr. Chic says "something happen" and the music changes.
- Talk to the City Dweller drawing on the ground one more time to receive a Stray Bead.
- Go to a sealed building to the left of the Kimono Shop and use the Cherry Bomb technique on the side of the building to enter the building.
- Open eight chests in the building to obtain an Incense Burner, a Holy Bone S, a Pearl, Glass Beads, two Crystals, an Exorcism Slip S, and a Sun Fragment.
- Head to the corner of the Commoner's Quarter between the Restaurant and the City Dweller drawing on the ground to Mr. Flower's house.
- Talk to Mr. Flower and use the Bloom technique on twenty non-cursed trees, one on top of Mr. Flower's head, one inside Mr. Flower's house, six surrounding his house, one next to the City Dweller drawing on the ground, six infront of the entrance into Sei-an City, two infront of the Weapon Dealer, two beside the Tool Dealer, and one next to the Kimono Shop.
- Go back to Mr. Flower and talk to him again.
- Follow Mr. Flower around the Commoner's Quarter and use the Bloom technique when he uncurses a tree.
- Talk to Bloom next to a house next to the Kimono Shop and offer her the Herbal Remedy.
- Enter Bloom's house and headbutt her father to wake him.
- Dig up and open a chest next to Blossom's house to obtain a Bull Horn.
- Help three villagers along the canal travel on the canal by using the Water Lily technique and the Galestorm technique to their requested area with over two minutes left.
- Leave Sei-an City and head to Sasa Sanctuary.
- Complete the Masu's monster manifest and return it to Masu to obtain a Golden Dust.
- Talk to Hayate running on the beach and agree to race him. Run infront of him and headbutt him.
- Take the path beside Ankoku Temple toward the Guardian Sapling and follow the paths to the left past cows to a crack in the hard ground.
- Dig up the hard ground to reveal a hole in the ground and jump in the hole.
- Fight the Bandit Spider. Use the Vine technique on three Konohana Blossoms and three hooks on the back of the Bandit Spider. When the Bandit Spider exposes a circle of barrels within it attack them.
- Obtain a Sun Fragment after you defeat the Bandit Spider.
- Exit the hole and continue to Sasa Sanctuary.
- Dig up hard ground near Bingo to reveal a hole. Jump in the hole to reach Moley's treasure trove.
- Open three chests in Moley's treasure trove to obtain a Godly Charm, a Stray Bead, and a Crystal; feed a group of monkeys Seeds, Meat, or Fish; dig up and bloom a clover; and use the Bloom technique on four trees.
- Exit Moley's treasure trove and continue to Sasa Sanctuary.
- Head past the hot springs and up the stairs to the bamboo forest.
- Talk to Mr. Bamboo and Kaguya.
- Follow Kaguya underground and to another digging game where you need to lead Kaguya to the bottom.
- Continue talking to Mr. Bamboo and Kaguya and receive the Fire Tablet.
- Return to Himiko's palace in Sei-an City.
- Enter Himiko's palace palace and take the elevator to the top floor.
- At the top floor obtain a Travel Guide: Holy Artifacts.
- Equip the Fire Tablet and cross the lava.
- Head down a corridor and to an Origin Mirror. Save the game at the Origin Mirror and continue down the corridor to Himiko.
- Talk to Himiko, agree to help her, and obtain the the Border Key.
- Exit Sei-an City and head to North Ryoshima Coast.
-
Land of the Dragonians
- Enter North Ryoshima Coast and follow the path. Along the path talk to Waka.
- Continue along that path and fight an Earth Nose. Use the Veil of Mist technique to defeat the Earth Nose and obtain Demon Fangs.
- Head off the path to a small lake with a pile of broken steps beside it.
- Dig up and open a chest beside the small lake to obtain a Stray Bead. The location of the chest is best seen at night.
- Cross the water to a piece of land. Dig up and bloom a clover on the piece of land.
- Feed a group of cats on the piece of land, fish.
- Cross back over the water and return to the path.
- Follow the path to an Origin Mirror. Save the game at the Origin Mirror.
- Use the Celestial Brush to draw an X on the X on the Origin Mirror and select "N. Ryoshima Coast (Rocky Area)" when the map appears.
- When teleported to the N. Ryoshima Coast (Rocky Area) dig up and bloom two clovers and open a chest to obtain a Stray Bead.
- Jump off the Rocky Area and return to the Origin Mirror on the path.
- Take the path to the left of the bridge towards the beach and Umi's Restaurant.
- To the left of the path feed a group of foxes meat, near a boulder.
- Dig up and open a chest by the foxes to obtain a Crystal. The location of the chest is best seen at night.
- Return to the path and continue along the path towards the beach and Umi's Restaurant.
- Feed a group of cats to the right of the path, fish.
- Enter Umi's Restaurant and talk to the Waitress and Umi, then exit.
- Go behind Umi's Restaurant and use the Power Slash technique on three clams in the water along the beach to obtain an Inkfinity Stone, an Exorcism Slip S, and an Incense Burner.
- Return to the path and take it back to the Origin Mirror
- Cross the bridge and talk to the Merchant on the right to purchase supplies.
- Use the Power Slash technique to open four chests in the river behind the Merchant, to obtain an Exorcism Slip M, a Wooden Bear, Glass Beads, and a Mermaid Coin.
- Dig up and bloom a clover in the hard ground by the Merchant.
- Continue along the path from the Merchant and take a right onto another path.
- Feed a few dogs along the path, meat.
- At the end of the path reach a Devil Gate. Enter the Devil Gate and defeat the enemies.
- Talk to a girl under a tree that appears after you destroy the Devil Gate.
- Feed a group of hares under the tree, herbs.
- Dig up and open a chest by the water under the tree to obtain a Bull Horn. The location of the chest is best seen at night.
- Go towards an elevated piece of land and dig a piece of hard ground to reveal a hole.
- Fall into the hole and feed a group of hares herbs; open three chests to obtain a Stray Bead, a Bear Statue, and a Golden Peach; dig up and bloom three clovers; and use the Bloom technique on four trees. Then exit the hole.
- Jump to the elevated piece of land by the tree and feed some cows on top, herbs
- Dig up and open a chest by the cows to obtain a STray Bead. The location of the chest is best seen at night.
- Talk to Yoichi by a pond and use the Waterspout technique on Yoichi's arrow to ripen a fruit on a Guardian Sapling on another island.
- Use the Water Lily technique to reach the island with the Guardian Sapling.
- On the island use the Power Slash technique to cut down the fruit from the Guardian Sapling; dig up and bloom a cloverl; open a chest to obtain a Traveler's Charm; and dig up and open a chest to obtain a Pearl. The location of the chest is best seen at night.
- Return to the path by the Merhant and follow it all the way to the beach.
- On the beach to the left of the path talk to a group of bullies surrounding Urashima.
- Headbutt Urashima after the bullies leave and talk to him.
- Go to Urashima's house on the beach and feed a group of pigs outside his house, seeds.
- Dig up and open a chest by Urashima's house to obtain a Bull Horn. The location of the chest is best seen at night.
- Use the Power Slash technique on two clams behind Urashima's house in the water along the beach to obtain a Vase and a steel Soul Sake.
- Follow the beach past Urashima's house to the pier. Go to the end of the pier and use the Sunrise technique.
- When Orca appears jump onto him and use him to reach Catcall Tower, a tall tower on an island.
- Jump off Orca when you reach the island and feed a group of cats fish, on the path to Catcall Tower
- Use the Origin Mirror infront of Catcall Tower to save the game. Then enter Catcall Tower.
- Move towards Catcall Tower and fight a Poltergeist.
- Open the chest at the bottom of Catcall Tower and obtain a Travel Guide: Mark of Kabegami.
- Climb Catcall Tower by jumping onto the paw prints. Continue up the tower until you cross a red line.
- When you cross the red line drop down to a platform and feed a cat on the platform, fish.
- Continue climbing up the tower until you cross a second red line.
- When you cross the second red line drop down to another platform and feed the cat on the platform, fish.
- Continue climbing up the tower until you cross a third red line.
- When you cross the third red line drop down to another platform, open a chest to obtain a Traveler's Charm, and feed the cat on the platform, fish.
- Continue climbing up the tower until you reach a platform surrounding the entire tower.
- Open a chest to obtain a Holy Bone S on this platform.
- Continue climbing up the tower until you cross a fourth red line.
- When you cross the fourth red line drop down to another platform and open a chest to obtain a Lacquerware Set.
- Continue climing the tower until you reach another platform not marked by a red line.
- Drop down to this platform and open a chest to obtain a Stray Bead.
- Continue climbing up the tower until you cross a fifth red line.
- When you cross the fifth red line drop down to another platform and open a chest to obtain a Cat Statue.
- Continue climbing up the tower and reach a room at the top of the tower.
- Open a chest by a Mermaid Spring to obtain a Mermaid Coin.
- Go up the stairs and open a chest on the next level to obtain an Incense Burner
- Go up another set of stairs and feed a cat on a platform, fish.
- Fill in the four stars when a constellation appears and obtain the Catwalk technique from Kabegami.
- Use the Catwalk technique above the cat statue to reach the highest point on the tower.
- Go to the end of a long platform behind the large statue and open a chest to obtain a Sun Fragment.
- Jump off the tower to the bottom of the tower.
- Go behind the tower and feed four cats fish, dig up and bloom three clovers, and use the Catwalk technique on two small towers to reach to reach two chests. Open the two chests on top of the two towers and obtain a Crystal and a Stray Bead.
- Exit Catcall Tower and reenter.
- Climb the entire tower again and open a chest that apperas at the top to obtain a Stray Bead.
- Jump off the top of the tower again and exit Catcall Tower.
- Ride Orca past the island next to catcall tower and land on the next island.
- Use the Waterspout or Galestorm technique on a flaming chest. Open the chest to obtain a Crystal.
- Use the Cherry Bomb technique on a crack in the ground to reveal a hole.
- Jump into the hole. Then dig up and bloom three clovers and use the Bloom technique on four trees.
- Donate 120,000 yen at the Divine Spring to obtain the Cherry Bomb 2 technique from Bakugami.
- Open the chest that appears after you receive the technique to obtain Travel Guide: Cherry Bomb 2.
- Exit the hole and ride Orca to the next closest island.
- On the path to the top of the island Dig up and bloom a clover.
- At the top of the island use the Power Slash technique on a boulder surrounded by pots to reveal a hole.
- Jump into the hole. Then dig up and bloom three clovers and use the Bloom technique on four trees.
- Donate 60,000 yen at the Divine Spring to obtain the Power Slash 2 technique from Tachigami.
- Open the chest that appears after you receive the technique to obtain Travel Guide: Power Slash 2.
- Exit the hole and use the Power Slash technique on the boulder beside the one surrounded by pots to reveal a clover to dig up and bloom.
- Ride Orca across the water to the next closest island. The island is a small island with a single tree.
- On the small island dig up and bloom a clover.
- Ride Orca to the next island.
- Dig up and open a chest to obtain a Golden Peach. The location of the chest is best seen at night.
- Dig up a crack in the hard ground to reveal a hole.
- Jump into the hole and Use the Vine technique on three Konohana Blossoms and three hooks on the back of the Bandit Spider. When the Bandit Spider exposes a circle of barrels within it attack them.
- Obtain a Sun Fragment after you defeat the Bandit Spider.
- Exit the hole and ride Orca to the next island. The island is large and has a long pier.
- Use the Power Slash technique on a clam to the left and another to the right to obtain a Holy Bone S and a Steel Fist Sake.
- Dig up and open a chest on the beach to obtain a Pearl.
- On the top of the island dig up and open a chest to obtain a Stray Bead. The location of the chest is best seen at night.
- Open a chest to obtain a Holy Bone M. Then dig up hard ground and bloom a clover by the chest.
- Dig up and bloom another clover on the other side of the island.
- Return to the pier and talk to the Fisherman. Help the Fisherman catch two fish and then the Marlin.
- Ride Orca back to the beach beside Umi's Restaurant use the Power Slash technique on a hard boulder to reveal a clover to dig up and bloom.
- Enter Umi's Restaurant, and talk to Umi in the kitchen.
- Use the Celestrial Brush to draw the symbol on the back wall of the kitchen when Umi cuts the Marlin to obtain the Whirlwind brush technique from Kazegami.
- Open the chest that appears after you receive the technique to obtain Travel Guide: Galestorm Tech.
- Exit Umi's Restaurant and return to the strip of land across from the pile of broken steps by the Origin Mirror.
- Use the Catwalk technique above the cat statue to climb the wall to the Watcher's Cape.
- Proceed forward and fight a Blue Cyclops. Use the Inferno or Fireburst technique to keep the Blue Cyclops pipe lit and attack him until he is defeated.
- Feed a group of tigers meat.
- Use the Crescent technique in the sky to make it night and talk to the Watcher.
- Use the Celestial Brush to draw a star in the sky by drawing a dot in the sky.
- When the Whirlpool Galaxy appears in the sky run to the end of the Watcher's Cape and use the Galestorm technique on the Whirlpool Galaxy in the sky to reveal the whirlpool in the water to the Dragon Palace.
- Ride Orca into the whirlpool and to the Dragon Palace.
- Follow the path to an Origin Mirror and save the game.
- Open three clams around the Origin Mirror to obtain a Holy Bone S, a Dragonfly Bead, and a Pearl
- Enter the Dragon Palace and head behind the stairs.
- Use the Cherry Bomb technique on the crack behind the stairs to reveal a hole to jump into.
- In the hole feed a boar and boar piglets seeds, dig up and bloom three clovers, use the Bloom technique on four trees, and open three chests to obtain a Kutani Pottery, a Godly Charm, and a Stray Bead.
- Exit the hole and head up the stairs.
- Take the set of stairs on the right and enter a room with a chest. Open the chest to obtain a Exorcism Slip S and exit the room.
- Take the set of stairs on the left and enter a room to purchase supplies from Mrs. Turtle. Exit the room.
- Go into the elevator between the two set of stairs and take it to Otohime.
- Talk to Otohime, agree to help Otohime get the Dragon Orb from inside the Water Dragon, and obtain the Shell Amulet.
- Take the elevator to the bottom and proceed down stairs. At the bottom of the stairs turn left and follow a hallway into a room with dancing girls.
- Open two clams on the left to obtain a Bull Horn and a Vengeance Slip; and dig up and bloom a clover on a higher ledge.
- Use the Rejuvinate technique on a pillar behind the dancing girls.
- Jump up the pillars to a chest. Open the chest to obtain a Stray Bead.
- Talk to the large dancer in purple and dig into the crack in the empty spring to reveal a hole.
- Jump into the hole and lead lead the dancer to the bottom of the empty spring.
- Talk to the dancer again and then use the Celestial Brush to swirl the spring and obtain the Fountain technique from Nuregami.
- Open the chest that appears after you receive the technique to obtain Travel Guide: Waterspout Tech 1.
- Exit the room and enter the room directly across the hallway past the stairs.
- In the room open two clams on the right to obtain an Inkfinity Stone and Glass Beads.
- Jump up to a higher ledge to another clam. Open the clam to obtain a Stray Bead.
- Jump into the Water Dragon's Mouth in the center of the room.
- Open three clams to the right of the path to obtain an Inkfinity Stone, Crystal, and Holy Bone S.
- Dig up and open a clam along the path to obtain a Bull Horn.
- Jump onto the pillars to the right and open a clam on the top pillar to obtain an Exorcism Slip S.
- Continue along the path and through a hallway. At the end of the hallway jump onto a path of pillars over water.
- Open four clams on the pillars to obtain a Vengeance Slip, a Steel Fist Sake, a Steel Soul Sake, and an Exorcism Slip M.
- Drop from the pillars into the water and swim to another group of pillars with an Exercising Arrow.
- Swim back to the pillars you dropped from and use the Waterspout technique on a power spring to return back to the path.
- On the path past the pillars and over the water dig up and open a clam to obtain a Pearl.
- Continue along the path and touch a small pond of water to restore your health.
- Use the Waterspout technique on a power spring by the small pond of water to reach a room with a chest. Open the chest to obtain a Crystal.
- Return back down to the path and follow it to an Origin Mirror. Save the game at the Origin Mirror.
- Continue on the path and unlock the door with the Exercising Arrow.
- Enter the room with the Dragon Orb and take a path on the right to another room with a pool of red water.
- Use the Waterspout technique in the pool of red water to the clog dripping red water in the ceiling to flood the room with red water.
- Use the Water Lily technique and return to the room with the Dragon Orb.
- Use the Waterspout technique in the pool of red water to the Dragon Orb to release and obtain the Dragon Orb.
- Fight three groups of three Tube Foxes. Use the Veil of Mist to slow down the Tube Foxes and constantly use the Cherry Bomb technique to cover the area with Cherry Bombs. Continue to attack the Tube Foxes until they are all defeated.
- Obtain the Fox Rods after they are defeated and exit the Water Dragon's mouth in under three minutes.
- Talk to King Wada after exiting the Water Dragon and give the Fox Rods to Rao.
- In the Dragon Palace return to the elevator take it back to otohime and give her the Dragon Orb
- Exit the Dragon Palace and head towards Ankoku Temple.
-
Oni Island's Whereabouts
- Use the Catwalk technique to return back to the Watcher's Cape before sunset.
- Run to the end of Watcher's Cape and run on the back of the Water Dragon to reach Oni Island.
-
Subzero Zone
- Follow the path to the left to an Origin Mirror and save the game.
- Continue along the path and fight Namahages and Blade Namahages.
- Enter Oki's house and follow Oki out of the house.
- Defeat Oki. Use the Veil of the Mist technique to slow down Oki and attack him.
- When Oki shoots ice at you use the Power Slash technique to send them back and stun Oki, then attack Oki.
- If you get hit with the ice you will be trapped in ice. Use the Power Slash technique or the Inferno technique to escape from the ice.
- When Oki turns into a wolf continue use the Veil of Mist technique to slow down Oki and use the Power Slash technique to send back the ice shot by Oki until Oki is defeated.
- Follow the path through a tunnel and talk to Yoichi on the left.
- Use the Thunderstorm technique on Yoichi's arrow to reveal the Guardian Sapling.
- Use the Bloom technique and bloom the Guardian Sapling.
- Return to the entrance of Kamui and feed the bears by the entrance fish.
- Go back to Yoichi's house and feed a group of sheep herbs.
- Use the Inferno technique on a chest covered in ice next to Yoichi's house to obtain a Pearl
- Follow the sign next to Yoichi's house that reads "To Dojo" along the path feed a group of foxes meat.
- Talk to Kokari and Ume along the path if you would like to catch more fish.
- Feed the cranes by Kokari and Ume fish.
- Dig up and open a chest in the group of cranes to obtain Etched Glass. The location of the chest is best seen at night.
- Use the Inferno technique on a chest covered in ice next to Kokari and Ume and a torch to obtain a White Porcelain Pot.
- Pass the torches and follow the path to the Dojo. Dig up and open a chest on the right of the path to obtain a Stray Bead. The location of the chest is best seen at night.
- Enter the Dojo and master the Hardhead, Counter Dodge, Holy Falcon, 4 Shears, Sword Dance, and any other previous techniques you have not mastered.
- Exit the Dojo and return to Yoichi's house and follow the path to the left of the Guardian Sapling.
- Fight an Igloo Turtle along the path. Continue to attack the Igloo turtle until his tail is on fire then use the Inferno technique to melt his igloo. Attack the Igloo Turtle after you use the Inferno technique until he is defeated.
- Use the Vine technique on a Konohana Blossom above the sign that reads "To Wep'keer" and land on a ledge next to the Guardian Sapling.
- On the ledge dig up and bloom a clover.
- Use the Cherry Bomb technique on a cracked wall to reveal a path.
- At the end of the path use the Cherry Bomb 2 technique on the ground to reveal a hole.
- Enter the hole and use the Bloom technique on four trees, dig up and bloom three clovers and donate 300,000 yen into the Divine Sptring to obtain the Cherry Bomb 3 technique
- EXit the hold and jump off the ledge abck onto the path. Feed a bear along the path fish.
- Headbutt a hard boulder to reveal a clover to dig up and bloom.
- Follow the path to a Merchant and purchase any needed supplies.
- Go behind the Merchant onto the frozen water and feed a bear to the left fish.
- Continue to an island with hard ground to dig up and reveal a hole.
- Dig up and bloom a clover on the island the jump into the hole.
- Use the Bloom technique on two trees and dig up and bloom three clovers.
- Talk to Blockhead Grande, then headbutt Blockhead Grande to reveal eight weak spots. Use the Celestial Brush to mark the eight spots in the order they were shown to obtain a Stray Bead, Gold Dust, a Silver Pocket Watch.
- Exit the hole and enter a Devil Gate near the hole and defeat the enemies inside to reveal a Mermaid Spring.
- Dig up and open a chest to obtain Amber Tassels by the Mermaid Spring. The location of the chest is best seen at night.
- Follow the edge of Kamui past Wali's house and dig up and open a chest to obtain a Stray Bead by Wali's house. The location of the chest is best seen at night.
- Feed a group of sheep outside Wali's house herbs.
- Enter Wali's house and talk to Wali to obtain Wali's Record of Penance. When you complete Wali's Record of Penance return it to Wali to obtain Gold Dust.
- Exit Wali's house and enter a Devil Gate nearby and defeat the enemies in the Devil Gate.
- Follow the edge along Kamui to a cave and enter it.
- Continue along the path in the cave and use the Inferno technique to open an ice covered chest to obtain a Vengeance Slip.
- Jump to a platform on the left and open a chest on the platform to obtain Travel Guide: Tribe of the Moon.
- Jump to the other end of the cave and use the Inferno technique to open an ice covered chest to obtain a Exorcism Slip L.
- Continue along the path to the end of the cave and feed a bear at the end of the cave fish.
- Turn around and jump back over the pit, then jump on to the platform on the right side and dig up and bloom a clover.
- Jump to the other end of the cave and follow the path to the end of the cave and feed a bear fish and use the Inferno technique to open an ice covered chest to obtain a Stray Bead.
- Exit the cave and head to a bridge feed some hares under the bridge herbs.
- Follow the ice covered water past the bridge and jump up to a ledge on the right. Open a chest to obtain Amethyst Tassels and feed the cranes by the chest fish.
- Drop from the ledge and return to the path past the bridge. Use the Power Slash technique on a hard boulder along the path to reveal a clover to dig up and bloom.
- Dig up and open a chest to obtain a Crystal past the heard boulder. The location of the chest is best seen at night.
- Continue to some bears to feed fish.
- Dig up and open a chest by the bears to obtain a Golden Peach. The location of the chest is best seen at night.
- Return to and cross the bridge and follow the path uphill. Jump down to a ledge on the right side of the path close to the top of the hill and dig up and bloom a clover on the ledge.
- Drop down to another ledge below and open a chest to obtain a Stray Bead.
- Use the Cherry Bomb technique on the cracked wall nearby to reveal an opening with a cracked floor to dig to reveal a hole.
- Enter the hole and defeat another Bandit Spider to obtain a Sun Fragment.
- Exit the hole and return to the path uphill and to Wep'keer.
- Save, at the origin mirror on the left
- Cross the ice to the right side of the entrance into Wep'keer and feed a group of hares herbs.
- Dig up and open a chest to obtain Jade Tassels close to the hares. The location of the chest is best seen at night.
- Dig up and bloom a clover in the center of Wep'keer in hard ground.
- Go to the set of stairs on the right side of Wep'keer and dig up and open a chest to the left of the stairs infront of a house to obtain Etched Glass.
- Take the set of stairs and feed some cranes fish at the top of the stairs.
- Dig up and open a chest to obtain a Stray Bead by the cranes. The location of the chest is best seen at night.
- Cross a small bridge to an island and dig up and bloom a clover.
- Return to the center of town.
- Take the set of stairs on the left side of Wep'keer past a Merchant stand.
- Follow the path to the right at the top of the first set of stairs past a house. Follow the wall on the right to a hidden crevice with a bear.
- Feed the bear fish and open the chest beside the bear to obtain a Stray Bead.
- Exit the hidden crevice and feed a group of sheep herbs infront.
- Dig up and bloom a clover at the end of the path.
- Return to the top of the first set of stairs on the left side of Wep'keer and follow the path up the next set of stairs to Kai's house.
- Feed a group of sheep herbs at the top of the stairs.
- Dig up and open a chest by the sheep to obtain a Stray Bead. The location of the chest is best seen at night.
- Go behind Kai's house and across a bridge to a group of sheep.
- Feed the group of sheep herbs and dig up and bloom a clover by the sheep.
- Drop down from the bridge and open a chest under the bridge to obtain a Sun Fragment.
- Return to the top of the set of stairs and follow the narrow path to the left of Kai's house until you reach Samickle.
- Talk to Samickle, then feed a bear to the left of the house fish.
- Dig up and open a chest next to the bears to obtain Kutani Potery.
- Attempt to exit Wep'keer and talk to Kai.
- Continue talking to Kai, then return to Samickle.
- Talk to Samickle and enter Kemu's house.
- Talk to Kemu, then headbutt him when he attacks you and talk to him again.
-
Bad Feeling Confirmed
- Head to Ankoku Temple and follow Rao up the stairs and behind Ankoku Temple into a hidden passage in the mountain.
- Jump into a well inside the mountain.
- At the bottom of the well follow the path to a set of stairs leading to Queen Himiko's Palace.
- In the palace take the elevator up to the top floor, swim across the lava, and follow the hallway to an Origin Mirror.
- Save the game at the Origin Mirror and enter Queen Himiko's throne room.
- Fight Evil Rao in the room. Use the Veil of Mist technique to slow Evil Rao and dodge her attacks. Surround yourself with cherry bombs using the Cherry Bomb technique. When Evil Rao jumps up and dives down towards you dodge her attack and attack her while she is stunned.
- After you defeat Evil Rao exit Queen Himiko's Palace and head to Watcher's Cape in the North Ryoshima Coast.
-
Oni Island
- At the end of the Water Dragon drop down and proceed until you reach a power spring.
- Use the Waterpout technique on the power spring and continue through a Golden Gate.
- Jump down into the lava and swim to a rock platform.
- Swim into the room to the right and use the Vine technique on a Konohana Blossom over a platform with a chest. Open the chest to obtain a Golden Peach.
- Swim past the room you dropped into and into left room. Use the Vine technique on a Konohana Blossom over a platform with a chest and open the chest to obtain a Pear.
- Use the Waterspout technique on a power spring in the lava to reach the entrance into Oni Island.
- Infront of the entrance fight a Blue Ogre and a Red Ogre. Use the Veil of Mist technique to get around the ogre and attack them from behind.
- Run away from the entrance and open two chests along a narrow path on the left to obtain a Crystal and a narrow path on the right to obtain an Exorcism Slip S.
- Enter Oni Isand and talk to the Imp Merchant on the right to obtain supplies.
- Save at the Origin Mirror beside the merchant.
- Go through the hallway on the left, enter the room on the right, and defeat two Poltergeists.
- Bite the Exercising Arrow in the room and run past the room with the Origin Mirror and merchant.
- Enter the hallway by the Origin Mirror and merchant and use the Exercising Arrow to unlock the door.
- Follow the path through the door to a set of stairs. Open a chest above the stairs to obtain a Bull Horn.
- Continue down the stairs and talk to Tobi.
- Race Tobi through the gate. Dash at the beginning of the race to beat Tobi.
- Talk to Tobi again and race Tobi across platforms through another gate into another room.
- open the chest in the room under the stairs to obtain a Crystal.
- Go up the stairs to a cat statue. Use the Catwalk technique to climb the wall by the statue.
- At the top of the wall turn around, jump across platforms, and reach Tobi again.
- Race Tobi across platforms along a long narrow hallway and through another gate.
- Race Tobi again through a hallway of saws through a gate into another room with a chest.
- Open the chest to obtain a Lacquerware Set.
- Race Tobi again past Demonic Wheels through a long narrow hallway and up a flight of stairs through a gate into another room with a chest.
- Open the chest to obtain a Exorcism Slip M.
- Race Tobi again defeat three Headless Guardians and enter the next room through the gate.
- Open a chest in the room to obtain a Coral Fragment.
- Go up the stairs and restore your health at the small pond.
- Enter an area with statues shooting lasers, open two chests on the right and left of the room to obtain a Pearl and a Golden Peach.
- Get to the other side of the room avoiding the lasers and go through a Golden Gate.
- Enter a room and fight a Blue Cyclops.
- Exit the room, follow the path through sliding doors to an Origin Mirror. and save at the Origin Mirror.
- Follow the path through more sliding doors and to another race with Tobi.
- Race Tobi past two saws, a closing spiked wall, and through the gate.
- Use the Cherry Bomb technique on a cracked wall at the end of the race.
- Follow the roof to the right to a cat statue.
- Use the Catwalk technique to climb the wall and jump back onto the roof.
- Follow the roof to the left and bite the Exercising Key.
- Drop down, exit the roof, and take the Exercising Key back to the locked door.
- Follow the hallway to a chest. Open the chest to obtain a Godly Charm.
- Continue down the hallway and through a door leading outside.
- Use the Rejuvinate technique on the statue of Gekigami, fill in four stars in the constellation, and obtain the Thunderstorm technique from Gekigami.
- Use the Thunderstorm technique on a lightning rod to open a door.
- Go through the door and use the Thunderstorm technique on another lightning rod to rotate a bridge.
- Cross the bridge and follow the path to a clover to dig up and bloom.
- Enter the door leading back inside and pass through a Golden Gate.
- Use the Thunderstorm technique on a chest in the middle of the path to obtain an Exorcism Slip L.
- At the dead end use the Cherry Bomb technique on the crack on the floor and drop down through the floor.
- Enter the path behind a wall scroll to a lightning key.
- Bite the key and go to another path of lightning platforms.
- Jump up the platforms and use the Thunderstorm technique to open the door at the top.
- Enter the room and fight a Headless Guardian.
- Continue through sliding doors to a labyrinth. Follow the walls through the labyrinth and open eleven chests within the labyrinth to obtain an Exorcism Slip S, an Incense Burner, a Wooden Bear, a Vase, a Vengeance Slip, a Steel Soul Sake, Glass Beads, a Holy Bone M, Traveler's Charm, a Dragonfly Bead, and a Steel Fist Sake.
- Exit the labyrinth, pass through the next room, and turn right in the hallway.
- Use the Thunderstorm technique to open the door to another room with a chest. Open the chest to obtain a Pearl.
- Exit the room and return to the room with the Origin Mirror and merchant.
- Save at the Origin Mirror and use the lightning key in the lock with a lightbulb.
- Pass down the hall through the gate and use the Thunderstorm technique on two chests to obtain an Inkfinity Stone and a Bull Horn.
- Continue along the hall and use the Thunderstorm technique on the sword of the large statue at the end of the hallway to reveal a set of stairs.
- Open up two chests by the stairs to obtain a Holy Bone S and a Crystal.
- Head down the stairs and enter a room with rising lava. Use the Power Slash technique on five eyeballs along the wall to drain the lava.
- Enter a new area, follow the tunnel left and use the Thunderstorm technique on a lightning rod to rotate the platform.
- Jump up the platform and onto another level.
- Follow the tunnel right to another rotating platform.
- Follow the tunnel past the lock with a lightbulb to a rotating spiked platform and a cat statue.
- Use the Power Slash technique on the spiked platform to stop the platform from rotating and use the Catwalk technique to climb the wall to the next platform.
- Continue through the tunnels and jump up three more rotating platforms.
- At the wood door blocking the path use the Power Slash technique to cut the door and bite a lightning key in the room.
- Jump up to a hidden tunnel on the left wall, then to the platform on the right.
- Use the Vine technique on two Konohana Blossoms above the platform to reach another tunnel on the right.
- Follow the tunnel and dash over a trap door to a chest. Open the chest to obtain a Pearl.
- Drop down the trap door and return to the hidden tunnel on the left wall.
- Follow the tunnel and dash over two trap doors to a chest. Open the chest to obtain an Exorcism Slip L.
- Return to the lock with the lightbulb and use the lightning key in the lock to open a door.
- Go through the door, jump up the platforms, and jump past the spikes.
- Jump up rotating platforms to the top and exit the area.
- Use the Origin Mirror in the next area.
- Jump to a higher ledge on the left by a set of stairs and bite an electric key.
- Drop down from the ledge and use the Thunderstorm technique on the statues shooting lasers to destroy them
- Head behind the stairs and use the Thunderstorm technique to open a chest to obtain Oni Island Map.
- Go up the stairs and follow the path of lightning platforms until you reach a Blocking Spider.
- Before passing the Blocking Spider turn around and jump to a platform with a chest. Use the Thunderstorm technique to open the chest to obtain a Vengeance Slip.
- Return to the lightning platforms and pass the Blocking Spider with the Veil of Mist technique.
- At the dead end drop the lightning key and drop down to another room with a chest. Open the chest to obtain a Pearl.
- Bite an Exercising Arrow on a ledge and use the Cherry Bomb technique on the cracked wall to exit.
- Use the Exercising Arrow to unlock the door to the left.
- Turn around and use Vine technique on the Konohana Blossom at the end of the hall to cross the purple water.
- Follow the path back to the ledge with the electric key and bite the electric key again.
- Return to the previously locked door and go through the door.
- Go up stairs and open a chest above the steps chest with the Thunderstorm technqiue to obtain a Bull Horn.
- Use Veil of Mist technique and Race Tobi past a Blocking Spider, bamboo spikes, and through the gate.
- Go back down the stairs and open a chest with the Thunderstorm technique to obtain a Lacquerware Set.
- Pass through the Golden gate and the sliding doors to fight a Blue Ogre and a Red Ogre
- Continue along the path to a wall with two square spiked sections.
- Use the Catwalk technique on the wall to climb the wall.
- At the top of the wall use the Catwalk technique to cross the room to another chest on a platform. Open the chest to obtain a Pearl.
- Drop down from the platform and use the Veil of Mist technique to pass a Blocking Spider.
- In the next room fight three enemies.
- Continue along the path outside to a Blockhead. Dash the Blockhead to reveal his weak spots, then use the Celestial Brush to mark them in the order they appear.
- Pass the Blockhead to Tobi. Before racing Tobi jump to a ledge above on the right and use the Cherry Bomb technique on the cracked wall.
- Return to and race Tobi. Use the Vine technique on a Konohana Blossom at the other end to reach the gate.
- Jump up to a platform on the left with a chest. Open the chest with the Thunderstorm technique to obtain a Crystal.
- Go outside and save the game at the Origin Mirror.
- Follow the path through Golden Gate to the top of Oni Island.
- Fill in four stars in the constellation and face Ninetails.
- Use the Veil of Mist technique to dodge Ninetails until he raises his sword. Use the Thunderstorm technique on the sword to seperate the tails from Ninetails. Defeat each tail using the Cherry Bomb technique. Once all the tails are defeated continue to avoid Ninetails and constantly shoot ink bullets at Ninetails. When Ninetails raises his sword use the Thunderstorm technique on the sword and when Ninetails loses his color attack him.
- After Ninetails is defeated obtain the Blade of Kusanagi save the game.
-
Shinshu's Rolling Thunder
- Make your way back to shore.
- Encounter Waka for another cutscene.
- Begin the long trek back to Shinshu Field.
- Find the cat statue along the eastern wall.
- Use the Catwalk technique to climb up to the top level.
- Find your way up the hill to the giant stone structure.
- Zap the sword sticking out of the top using the Thunderstorm technique to gain entrance to the structure.
- Enter the stone building.
- Make your way through the long tunnel and out the other side.
-
Lika is Missing!
- Exit Kumu's house and talk to the merchant next to the set of stairs on the left side of Wep'keer to purchase Resurrection Beads, Gold Dusts, and any other needed supplies.
- Enter the Snowy Playground down the stairs infront of Kai's house and talk to Otter Mask.
- Use the Inferno technique on a three chests along the wall of the Snowy Playground covered in ice to obtain a Crystal, Porcelain Pot, and Exorcism Slip M.
- Dig up and open a chest at the other end of the Snowy Playground past two snowmen to obtain a Stray Bead. The location of the chest is best seen at night.
- Roll the snowball infront of Otter Mask over the piles of snow and avoid the fire until Otter Mask aproves of the size of the snowball.
- Exit the Snowy Playground and enter Kamui (Ezofuji) through the doors next to Kemu's house.
- Save at the Origin Mirror once you enter Ezofuji.
- Open the chest behind the Origin Mirror to obtain Travel Guide: Another Civilization.
- Run along the right wall of Lake Naochi to Konohana Blossom above a ledge.
- Use the Vine technique on the Konohana Blossom to reach the ledge with two chests.
- Use the Galestorm technique on the chest covered in flames to obtain an Etched Glass.
- Use the Fireburst technique on the other chest covered in ice to obtain a Stray Bead.
- Use the Vine technique and follow a path of Konohana Blossoms above the ledge to reach another ledge.
- Feed a group of monkeys on the ledge seeds, meat, or fish.
- Dig up and bloom a clover next to the monkeys.
- Run along the left wall of Lake Naochi to a group of cranes and feed them fish.
- Return to the Origin Mirror and take the path uphill to the left of the lake.
- Along the path feed some racoons meat or fish.
- Continue along the path and feed a bear fish.
- Drop down off the path at the bend to a ledge.
- Feed a group of monkeys on the ledge seeds, meat, or fish.
- Use the Power Slash technique on the red boulder to reveal a hole, then jump into the hole.
- In the hole use the Bloom technique on four trees and dig up and bloom three clovers.
- Head to the Divine and offer 360,000 yen to obtain the Power Slash 3 technique.
- EXit the hole and use the Power Slash technique on the green glowing boulder to reveal a spot to dig up and bloom a clover.
- Return to the path and follow it all the way to the top to an Origin Mirror and Tuskle's house.
- Enter Tuskle's house and talk to her and obtain Sewaprolo.
- Exit the house and use the Vine technique on a Konohana Blossom to the right of the house to reach a ledge.
- On the ledge dig up and bloom two clovers in hard ground.
- Dig up and open a chest next to the two clovers to obtain a Stray Bead. The location of the chest is best seen at night.
- Use the Vine technique on another Konohana Blossom above the hard ground to reach a higher ledge with a chest. Open the chest to obtain a Sun Fragment.
- Follow a path from the chest to the end and dig up and bloom a clover.
- Dig up and open a chest next to the clover to obtain a Stray Bead.
- Drop back down to the ledge with the hard ground and use the Vine technique to reach a lower ledge.
- Dig up and bloom a clover on the lower ledge.
- Feed a group of sheep seeds next to the clover.
- Leave Ezofuji and return back to Wep'keer.
- Use the Origin Mirror to warp to Kamui (Ezofuji Rocky Area)
- At Ezofuji Rocky Area feed a bear fish and open three chests to obtain a White Porcelain Pot, a Stray Bead, and a Silver Pocket Watch.
- Warp back to Wep'keer, then exit Wep'keer.
- Follow the path down hill and turn left once you cross the bridge.
- Continue on the path until you encounter Bull Charger. Attack the Bull Charger from behind to defeat him.
- Enter Yoshpet when you reach the end of the path.
- Talk to Waka, then save at the Origin Mirror along the path.
- Talk to Kai, then follow her through Yoshpet. Disregard the timer, the only penalty is returning to the start of Yoshpet.
- open a chest along the path to obtain a Crystal.
- Follow Kai to an area with twelve Evil Trees and stun and bloom the twelve Evil Trees.
- Open a chest along the path through the Evil Trees to obtain a Pearl.
- Continue following Kai over small islands. Stun and bloom three Evil Trees on the islands, then open a chest to obtain Holy Bone S.
- Continue along the path and stun and bloom two more Evil Trees.
- Follow Kai to a fork in the path. Do not follow Kai and take the left path on the left to a chest to open and obtain Cat's Eye Tassels.
- Return to the fork, then follow Kai along the right path and open two chests along the path to obtain a Holy Bone M and a Godly Charm
- Jump across ice covered islands and open a chest to obtain a White Porcelain Pot.
- Continue on the path and stun and bloom five more Evil Trees.
- Open a chest along the path to obtain a Stray Bead.
- Continue on an ice covered lake and stun and bloom nine Evil Trees, then open a chest to obtain a Kutani Pottery.
- Follow the path and open a chest to obtain a Steel Soul Sake.
- Stun and bloom another Evil Tree, then follow Kai to another fork in the path.
- Do not follow Kai again and take the right path to a dead end. Dig up and open a chest at the dead end to obtain a Stray Bead.
- Return to the fork and follow Kai along the left path to Ponc'tan.
- Outisde of Ponc'tan use the Bloom technique on two trees and feed a group of hares herbs, a group of deer herbs, and boars and boar piglets seeds.
- Head to the stump in the middle and enter Ponc'tan.
- Use the Origin Mirror at the entrance of Ponc'tan to save.
- Use the Vine technique on a Konohana Blossom above the Origin Mirror to reach a platform with a chest. Open the chest to obtain a Stray Bead.
- Use the Vine techqniue on another Konohana Blossom above this platform to reach Mono's house. Enter Mono's house and talk to her.
- Exit the house and follow the path around the house to a chest. Open the chest to obtain a Vengeance Slip
- Return to the entrance of Mono's house and jump to the top of a large mushroom with a clover to dig up and bloom.
- Drop down from the mushroom and walk to the bridge leading toward the Origin Mirror.
- Use the Vine technique on a Konohana Blossom to the left of the bridge to reach a platform with a chest. Open the chest to obtain Agate Tassels.
- Use the Vine technique on two more Konohana Blossoms and reach Hotaru.
- Talk to Hotaru and cross the bridge beside him to a chest. Open the chest to obtain a Crystal.
- Follow the path over another bridge to a clover to dig up and bloom.
- Head back over the two bridges and enter Miya's house.
- Talk to Miya, then exit her house.
- Cross the bridge to the large mushroom, then take the web bridge on the right to Gengo the merchant's house. Purchase the Eighth Wonder for 200,000 yen and any other needed supplies.
- Follow the path behind Gengo's house and talk to Kunu at the fork in the path.
- Cross the bridge on the right to a chest. Opent he chest to obtain an Inkfinity Stone.
- Return to the fork and cross the bridge on the left to a chest. Open the chest to obtain a Steel Fist Sake.
- Use the Vine technique on a Konohana Blossoms far above a group of platform lily pads.
- Follow the path of lily pads to a chest. Open the chest to obtain a Pearl.
- Jump into the water on the right of the path and use the Waterspout technique in the water to reach another platform with a chest. Open the chest to obtain Kutani Pottery.
- Use the Vine technique above a lower platform with a chest. Open the chest to obtain a Stray Bead.
- Use the Vine technique on a path of Konohana Blossoms to another platform with a chest. Open the chest to obtain Etched Class.
- Use the Vine technique on a Konohana Blossom next to the entrance of Ishaku's house.
- Attempt to enter Ishaku's house and talk to the guards.
- Enter Ishaku's house and talk to Ishaku.
- Exit the house and follow the path around Ishaku's house to a power spring.
- Use the Waterspout technique to reach the entrance of Issun's house.
- Use the Vine technique on a Konohana Blossom above Mrs. Seal's floating house.
- Enter the house and talk to Mrs. Seal to purchase a seal.
- Exit her house and drop down from her house and exit Ponc'tan.
- Talk to Issun and Miya, then follow the path behind Ponc'tan to Inner Yoshpet.
- Follow Issun along the path through Inner Yoshpet to a chest. Open the chest to obtain Turquoise Tassels.
- Continue along an ice covered path and stun and bloom four Evil Trees.
- Avoid rolling snowballs, then stun and bloom another Evil Tree and open a chest to obtain a Stray Bead.
- Head down the path from the chest and stun and bloom four more Evil Trees.
- Continue along the path to a fork and take the right path to a dead end with a chest. Open the chest to obtain an Etched Glass.
- Return to the fork and take the left path into another area. Follow the path to two Evil Trees.
- Stun and bloom the two more Evil Trees and open the chest by them to obtain a White Porcelain Pot.
- Continue along an ice covered bridge and stun and bloom three Evil Trees on an island to the right and three more Evil Trees on an island to the left of the bridge.
- Stun and bloom two more Evil Trees at the end of the bridge, then continue along an ice covered path to a fork in the path.
- Take the path to the left to a dead end with a chest. Open the chest to obtain a Stray Bead.
- Return to the fork and take the path on the right to another area. Follow the path and stun and bloom another Evil Tree.
- At the dead end climb the wall on the right to a ledge with a chest. Open the chest to obtain a Stray Bead.
- Stun and bloom two more Evil Trees on the other side of the pit.
- Continue along the path and open a chest to obtain an Inkfinity Stone, then stun and bloom an Evil Tree by the chest.
- Follow the path to another fork and take the path on the right to a dead end. Dig up and open a chest at the dead to obtain a Sun Fragment.
- Return to the fork and take the path on the left to the Spirit Gate.
- Use the Origin Mirror infront of the Spirit Gate to save the game, then enter the Spirit Gate.
-
- Spirit Gate (Kamiki Village)
- Talk to Shakuya
- Follow the path to the sacred deck and use the Bloom technique on four trees along the path.
- Head down to Kamiki Village and use the Bloom technique on four more tree down the path.
- Swim to the island on the right of the path into Kamiki Village and dig up and bloom a clover.
- Return to Kamiki Village and use the Bloom technique on a tree infront of Mr. Grapefruit's house.
- Dig up and open a chest next to Mr. Grapefruit's house to obtain Kutani Pottery.
- Use the Bloom technique on a tree infront and behind of Nami's Sake House.
- Pass the turnip field feed the dog next to Mushi meat.
- Use the Bloom technique on a tree next to the bridge and the tree next to Mrs. Grapefruit.
- Talk to Mrs. Grapefruit, then jump onto the ledge infront of her to dig up and bloom a clover.
- Use the Power Slash technique on chests in the river to obtain a Crystal, a White Porcelain Pot, and Etched Glass.
- Cross the bridge and use the Bloom technique on a tree to the right of the bridge.
- Follow the path and talk to the Merchant purchase the Trinity Mirror, the Eighth Wonder, and any other needed supplies.
- Head back down to the Origin Mirror and save the game.
- Go behind Nagi's house and use the Bloom technique on a tree next to his house.
- Headbutt Nagi to wake him up and fight him. Use the Cherry Bomb technique to surround Nagi and defeat him.
- Head to the island behind Nagi's house and dig up and bloom a clover.
- Go to the next island further away and dig up and open a chest to obtain a Pearl.
- Return to Kamiki Village and go to the Nami near the waterfall.
- Quietly bite the Sacrificial Robe, then take the robe to Nagi.
- Head to Shinushu Field with Nagi on your back.
-
- Spirit Gate (Shinushu Field)
- Use the Bloom technique on the six trees along the path.
- Encounter and defeat a group of Clay soldiers. Use the Veil of Mist technique to obtain Demon Fangs.
- Dig up and open a chest to the right surrounded by stones to obtain Kutani Pottery.
- Head through the gate where the Guardian Sapling will be in the future and open a chest to obtain a Silver Pocket Watch.
- Follow the path towards where the Nameless Man's house will be in the future and dig up and bloom a clover at the end of the path.
- Head to the path to the Dojo and use the Power Slash technique on a large boulder to the left of the path to reveal a clover to dig up and bloom.
- Open a chest above the Mermaid Spring to obtain an Exorcism Slip L
- Dig up and bloom a clover along the edge of the area where the Dojo will be in the future.
- Use the Power slash technique on a large boulder to the right of the path going uphill to reveal a clover to dig up and bloom.
- Dig up and bloom a clover at the top of the hill.
- Use the Power slash technique on a large boulder to the right of the gate toward the Moon Cave to reveal a clover to dig up and bloom.
- Dig up and bloom another clover further to the right of the gate toward the Moon Cave.
- Dig up and bloom another clover to the left of the downhill path to the Moon Cave.
- Open a chest to the right of the downhill path to the Moon Cave to obtain Etched Glass and use the Bloom technique on the two trees next to the chest.
- Continue to the Moon Cave.
- Use the Origin Mirror along the path to the Moon Cave to save the game.
- Fight two Dogus along the path to the Moon Cave. Use the Cherry Bomb technique to stun them then attack them with the Eighth Wonder equipped.
- Climb the stairs to the Moon Cave and pick up the 8 Purification Sake.
- At the top of the stairs head through the Golden Gate and encounter Orochi.
- Stand infront of one of Orichi's eight heads until it attacks.
- Dodge the attack and wait for the head to roar.
- Use the Waterspout technique to lift the sake into the mouth of Orochi's head.
- Continue feeding the sake, by dodging the head's attack and waiting for it to roar, until the head collapses.
- Move onto the next head and continue feeding each head sake until all the heads collapse.
- Climb the heads to the center of Orochi and attack the bell until it is destroyed.
- Once the bell is destroyed continue feeding each of Orochi's heads then attack and defeat each head until all eight heads are defeated.
- Use the Crescent technique when Nagi appears then use the Power Slash technique after Nagi strikes Orochi's heads.
- Defeat Orochi and obtain the Thunder Edge.
- Wait for the cutscene after Orochi's defeat.
- Exit the Moon Cave and the Spirit Gate, then bring Lika to the top of Kamui (Ezofuji) and enter the Wawku Shrine.
- TIP: Watch for the falling rocks.
-
Day of Darkness
- Warp to the Spirit Gate in Yoshpet Forest.
- Follow the path back through Yoshpet
- Reenter Kamui.
- Make your way to the north to Wep'keer.
- Climb up to the top of the mountain village.
- Go through the gates to the north.
- Follow the path towards the lake
- Take Lika to the shrine before you and watch the cutscene.
- Follow the path that runs along the lake to the left to find the villagers at the mouth of the cave at the end of the trail.
- Watch the cutscene with the villagers.
- Enter the large gate that Oki opened.
- Follow the path towards the cannons and use the Veil of Mist technique to avoid their fire.
- Use the Power Slash technique on the cannon balls to defeat them.
- Dig up and open two chests beneath the two cannons to obtain a Stray Bead and Ruby Tassels.
- Continue through the door and follow the path on the right to an ice covered door.
- Use the Inferno technique to melt the ice, then proceed through the door into another room.
- Use the Inferno technique to melt the ice on a scale in the middle of the room.
- Bite the two small plants at the end of the path and put them on the scale.
- Use the Bloom technique on the two plants and balance the scale.
- use the Galestorm technique on the snowball by the entrance to move it to a button.
- Jump to the other side of the room and obtain an Exercising Arrow, then open a chest to obtain a Vengeance Slip.
- Return to the entrance with the Exercising Arrow and unlock the door.
- Go through the door and use the Inferno technique to melt the ice in the center of the room to reveal a power spring.
- Use the Waterspout technique on the power spring and take it to a higher platform.
- Follow the path to a dead end, then use the Catwalk technique on a cat statue above the dead end to climb the wall and jump to a path on the left.
- Continue on the path to spinning platforms. Do not cross the platform but drop down to another platform and open a chest to obtain Etched Glass.
- Use the Cherry Bomb technique on a cracked wall and return to the spinning platforms.
- Use the Veil of Mist technique to cross the spinning platform, then the Power Slash techhnique to defeat the cannons along the path.
- Press the button at the end of the path to stop the platforms from spinning.
- Cross the bridge and go through the Golden Gate, then save the game at the Origin Mirror to the right.
- Enter the door infront of the Golden Gate and use the Veil of Mist technique to slow down spinning gears and cross the room.
- Jump to a ledge above the second spinning gear to a chest. Open the chest to obtain Kutani Pottery.
- Continue and use the Inferno technique on a ice covered chest to obtain Sapphire Tassels.
- Follow the path and dig up and bloom a clover along the path.
- Cross the Flame Spiders in the next area using the Veil of Mist technique.
- Past the Flame Spiders drop down to another path and fight Great Tengu. Jump and attack great Tengu until he is defeated.
- Follow the path to the blizzard blowing machine.
- Use the Cherry Bomb technique on a cracked wall to the right of the blizzard blowing machine to reveal a cave.
- Enter the cave, then stun and bloom an evil tree.
- Use the Galestorm technique to reveal the proper positions for the wheels, then return to the blizzard blowing machine.
- Use the Inferno technique on the ice covered lever to the left of the machine.
- Use the Veil of the Mist technique and then use the Power Slash technique on the lever to stop the Left Wheel when the eye is pointing up.
- Use the Veil of the Mist technique and then use the Power Slash technique on the lever to stop the Center Wheel when the eye is pointing right.
- Use the Veil of the Mist technique and then use the Power Slash technique on the lever to stop the Right Wheel when the eye is pointing left.
- Complete the constellation and obtain the Blizzard techinque and the Solar Flare from Itegami.
- Use the Blizzard technique on a Flame Spider and return back to the upper ledge and the room with the Flame Spiders.
- Use the Blizzard technique on the Flame Spiders to reach a ledge along the right wall with a chest. Open the chest to obtain a Stray Bead.
- Return to the area with the Origin Mirror and fight a Poltergeist.
- Use the Blizzard technique on a nearby Flame Spider and jump to a bridge.
- Continue along the bridge to another Flame Spider and use the Blizzard technique to reach a ledge with a chest. Open the chest to obtain a Stray Bead.
- Jump down from the ledge and continue along until you reach the end of the bridge.
- Use the Inferno technique on a block of ice across the pit to reaveal a Konohana Blossom
- Use the Vine technique to cross the pit, then use the Catwalk technique to reach a ledge.
- Use the Blizzard technique on the path of Flame Spiders to reach a door at the top.
- Enter the door and go through a Golden Gate.
- Use the Veil of Mist technique to cross the spinning gears to another platform.
- Use the Inferno technique on an ice covered chest to obtain the Wawku Shrine Map.
- Use the Veil of Mist technique to cross another gear, then use the Inferno technique on the ice covered door and go through the door.
- Cross the first two spinning platforms in the next room, then use the Blizzard technique on the flame covered spinning platform and cross it.
- Continue into another hallway and use the Blizzard technique on the snowflakes to create ice covered platforms, then cross the platforms.
- Dig up and bloom a clover after crossing the ice covered platforms.
- Continue along the path with four Evil Trees. Stun and bloom the four Evil Trees along the path, then pass through a door at the end.
- Use the Galestorm technique on the flames, then the Veil of the Mist and Power Slash techniques to defeat the cannon, to get through the hallway.
- Pass through a door and use the Veil of Mist and Power Slash techniques to defeat another cannon in the next hallway.
- Pass through the door at the end of the hallway and through another Golden Gate.
- Use the Inferno technique on two ice covered chests to obtain a Holy Bone M and a Inkfinity Stone.
- Save the game at the Origin Mirror.
- Pass through the door and encounter Nechku. Use the Power Slash technique on Nechku's projectiles to stun him, then attack him until he is defeated.
- After the battle, bite the small gear in the corner, then talk to Oki.
- Cross the bridge inside, then save at the Origin Mirror by the Golden Gate.
- Use the gear on the door by the Flame Spider to unlock the door, then go through the door and another Golden Gate.
- Use the Inferno technique to fire the cannons to eliminate the cannons on the other side.
- Use the Blizzard technique to create platforms and cross the pit.
- Use the Veil of Mist and Power Slash technique to defeat one more cannon and open a door.
- Dig up and bloom a clover after crossing the pit.
- Use the Inferno technique to melt a block of ice to reveal a snowball, then fight a Great Tengu infront of the door into the next room.
- Use the Galestorm technique on the snowball to blow it into the next room.
- Use the Blizzard technique to stop the flame covered spinning gears on the left to reach a platform with a flame covered chest. Use the Galestorm technique on the flame covered chest to obtain Emerald Tassels
- Use the Blizzard technique to stop the flame covered spinning gears to reach a platform on the far right corner of the room.
- Use the Cherry Bomb technique on a crack on the platform to reveal an Exercising Arrow.
- Bite the Exercising Arrow, then use the Blizzard technique to stop the flame covered spinning gears to reach a platform on the far left corner of the room and unlock a door.
- Go through the door and enter the next room.
- Use the Inferno technique to open to ice covered chests on the right to obtain a Godly Charm and Kutani Pottery.
- Talk to the Imp Merchant to purchase any needed supplies.
- Save the game at the Origin Mirror.
- Go through the Golden Gate and talk to Oki.
- Fight together with Oki to defeat Lechku and Nechku. Use the Power Slash technique on Lechku and Nechku's projectiles, the Bloom technique on buds, the Inferno technique on the bombs, and the Thunderstorm technique on the raised sword to stun Lechku and Nechku, use the bow that appears to fire Oki at the stunned enemy, then attack the stunned enemy until Lechku and Nechku are defeated.
- Obtain a Sun Fragment once Lechku and Nechku are defeated obtain a Sun Fragment and save the game.
-
Rising Yamato
- Use the Origin Mirror in Wep'keer to return to Kamiki Village.
- Head to the Guardian Sapling and use the Power Slash technique to cut the fruit from the tree to obtain Kutani Pottery and Silver Pocket Watch.
- Exit Kamiki Village and head to Shinshu Field.
- Enter Shinhsu Field and talk to the Nameless Man and obtain the Pure Neck vase.
- Bite the vase and take the Pure Neck vase to the guardian statue where the Moon Temple previously existed.
- Go to Tama's house and use the Cherry Bomb 3 technique in his house.
- Exit Tama's house and return to the Nameless Man. Talk to the Nameless Man and obtain a stray bead
- Dig up a chest in the hard ground infront of the entrance into the Tsuta Ruins to obtain a Bull Statue.
- Use the Power Slash technique on a boulder by the log bridge to Taka Pass to reveal the location of a clover to dig up and bloom.
- Return to Taka Pass.
- Use the Catwalk technique on a cat statue on the path uphill towards Kusa Village to reach a ledge with a clover to dig up and bloom.
- Head to the Gale Shrine in Kusa Village.
- Enter the Gale Shrine and follow the hallway on the right until you reach the Princess Fune and the Canine Warriors.
- Talk to Princess Fune and fight the Canine Warriors. Constantly jump to dodge the Canine Warriors and use the Cherry Bomb technique to fill the room with bombs. While in the air fire your beads until the Canine Warriors are defeated.
- Obtain a Stray Bead from Princess Fune.
- Go to the Ryoshima Coast.
- Head towards the Guardian Sapling and enter the hole on the left of the path by the cows.
- Enter the Devil Gate and defeat the enemies within the gate.
- Continue to enter the Devil Gate after you defeat each group of enemies until you obtain a Golden Peach and a Stray Bead.
- Go down to the beach, talk to Hayate and race him.
- After you beat Hayate use the Sunrise and Crescent technique and race Hayate again to obtain a Stray Bead.
- Go to the Dojo and purchase any unmastered techniques.
- Use the Power Slash technique on a large boulder outside the gate to North Ryoshima Coast to reveal the location of a clover to dig up and bloom.
- Head to Sei-an City.
- Purchase the Tundra Beads from the Weapon Dealer.
- Use the Inferno technique to light the tourches in the city, then talk to the soldier in the corner of the city by the power spring.
- Use the Crescent technique to make it night, then use the Power Slash technique on a boulder nearby to reveal Hayaze.
- Talk to Hayaze, then chase the multiple Hayazes and use the appropriate Celestial Brush technique on each of them in the correct order to catch him. After you catch him, headbutt him and obtain a Glass Watch.
- Bite the Glass Watch and offer it to Samurai Dandy by the entrance into Sei-an City.
- Use the Power Slash technique on a boulder neary the soldier again to reveal Hayaze.
- Talk to Hayaze again, then chase the multiple Hayazes and use the appropriate Celestial Brush technique on each of them in the correct order to catch him. After you catch him again, headbutt him and obtain Millet Dumplings.
- Use the Sunrise technique, then bite the Millet Dumplings and offer them to Momotaro infront of Blossom's house.
- Use the Crescent technique, then use the Power Slash technique on a boulder neary the soldier again to reveal Hayaze.
- Talk to Hayaze again, then chase the multiple Hayazes and use the appropriate Celestial Brush technique on each of them in the correct order to catch him. After you catch him again, headbutt him and obtain a Chrysanthemum Hairpin.
- Bite the Chrysanthemum Hairpin and offer it to a City Dweller in the restaurant.
- Talk to Hayaze again, then chase the multiple Hayazes and use the appropriate Celestial Brush technique on each of them in the correct order to catch him. After you catch him again, headbutt him and obtain a Tao Mask.
- Bite the Tao Mask, then use the Waterspout technique on the power spring by the soldier to reach the floating island and offer it to Abe in the headquarters to obtain a Stray Bead.
- Head to the Aristocratic Quarters and go behind Queen Himiko's palace.
- Talk to the Handmaiden then, use the Waterspout technique on the four rocks in the water to obtain the Deluge technique from Nuregami.
- Open the chest to obtain Travel Guide: Waterspout Tech 2.
- Exit Queen Himiko's palace and go behin the tall building on the right.
- Use the Catwalk technique on the tall building to reach a room at the top of the building.
- Talk to Gen in the top of the building and offer the Gimmick Gear,
- Use the Celestial Brush to follow the dotted lines and obtain the Thunderbolt technique from Gekigami.
- open the chest that appears to obtain Travel Guide: Thunderstorm Tech
- Use the Thunderstorm technique to open a chest to obtain a Stray Bead.
- Go to the Emperor's palace and purchase the Water Tablet from the Emperor.
- Return to the Commoner's Quarters and use the Crescent technique to make it night.
- Talk to Camille then, make dots on the ground with the Celestial Brush to make trees.
- Talk to Camille again then and make dots on the ground again with the Celestial Brush to make trees appear then, use the Deluge technique to make it rain.
- Talk to Camellia to obtain a Stray Bead.
- Exit Sei-an City and head back to North Ryoshima Coast.
- Go to the island next to Catcall Tower and use the Power Slash technique on a boulder to reveal the location of a clover to dig up and bloom.
- Dig up and open a two chests on the island to obtain a Pearl and Crystal. The location of the chests are best seen at night.
- Return to the island where you fought the Bandit Spider on the opposite side and enter the hole again.
- Enter the Devil Gate and defeat the enemies within the gate.
- Continue to enter the Devil Gate after you defeat each group of enemies until you obtain a Golden Peach and a Stray Bead.
- Return to the Origin Mirror and go to the Dragon Palace.
- Enter the Dragon Palace and go to the room on the left and use the Bloom technique in the center of the room.
- Open a chest that appears to obtain a Treasure Box.
- Take the elevator up to Otohime and talk to her to obtain a Stray Bead.
- Exit the Dragon Palace and back to North Ryoshima Coast.
- Go to Urashima's house and offer the Treasure Box to Urashima to obtain a Stray Bead, then return to the City Checkpoint.
- Equip the Water Tablet and run to an island at the end of the river.
- On the island use the Bloom technique on a tree, dig up and bloom a clover, and dig up and open a chest to open a Stray Bead.
- Go to the Origin Mirror and warp to Kamui.
- Head up the path to the entrance into Wep'keer and drop down to the right from the path to reach a cave with a hole where you fought a Bandit Spider.
- Enter the Devil Gate and defeat the enemies within the gate.
- Continue to enter the Devil Gate after you defeat each group of enemies until you obtain a Golden Peach and a Stray Bead.
- Exit the hole and return to Ponc'tan.
- Enter Ishaku's house and talk to him to obtain a Stray Bead.
- Exit Ponc'tan and return to the entrance of Yoshpet.
- Talk to Kai and race her through Yoshpet to obtain a Stray Bead.
- Head to the Ark of Yamato .
- Purchase Gold Dust from Marco on the left once you enter.
- Continue along the path and save at an origin mirror on the left.
- Follow the path on the far left and talk to Hakuba.
-
- Boss: Ninetails Revisited
- Enter the room at the end of the path and fight Ninetails.
- Use the Veil of Mist technique to dodge Ninetails until he raises his sword. Use the Thunderstorm technique on the sword to seperate the tails from Ninetails. Defeat each tail using the Cherry Bomb technique. Once all the tails are defeated continue to avoid Ninetails and constantly shoot ink bullets at Ninetails. When Ninetails raises his sword use the Thunderstorm technique on the sword and when Ninetails loses his color attack him.
- Exit the room and talk to Hakuba again.
-
- Boss: Crimson Helm Revisited
- Follow the path to the next room and fight Crimson Helm.
- Circle around Crimson Helm and attack his back side until his armor is removed. Once his armor is removed use the Galestorm technique to remove the flames from his body. Then attack Crimson Helm with the Power Slash or Cherry Bomb technique. When his armor returns circle Crimson Helm and repeat the attacking process until he is defeated.
- Exit the room then, follow the next path and talk to Sado.
-
- Boss: Spider Queen Revisited
- Enter the room at the end of the path and fight Spider Queen.
- Circle the Spider Queen and use the Vine technique on the hooks on the back of the Spider Queen and the surrounding Konohana Blossoms. Hooking three Konohana Blossoms exposes balls that you need to attack. Eliminate as many balls as you can before the Spider Queen closes her back. Once all the balls are eliminated the Spider Queen is defeated.
- Exit the room and talk to Sado again.
-
- Boss: True Orochi Revisited
- Follow the path to the next room and fight Orochi.
- Stand infront of one of Orichi's eight heads until it attacks.
- Dodge the attack and wait for the head to roar.
- Use the Waterspout technique to lift the sake into the mouth of the head.
- Continue feeding the sake, by dodging the head's attack and waiting for it to roar, until the head collapses.
- Move onto the next head and continue feeding each head sake until all the heads collapse.
- Climb the heads to the center of Orochi and attack the bell until it is destroyed.
- Once the bell is destroyed continue feeding each of Orochi's heads then attack and defeat each head until all eight heads are defeated.
- Exit the room then, follow the next path and talk to Azumi.
- Enter the room at the end of the path and fight Blight.
- Defeat Blight by using the Veil of Mist technique when Blight yells. If he charges get behind him and attack his back. If Blight surrounds himself with swords use the Power Slash technique on the glowing sword and dodge the remaining swords then attack the glowing sword when it lands on the ground.
- Exit the room and talk to Azumi again.
-
Final Boss: Yami
- Return to the center of the Ark of Yamato and talk to Marco to stock up on useful items before the final boss battle.
- When ready, step into the portal to face the Yumi, final boss.
- NOTE: The fight will last through several stages. The giant evil sphere will change color throughout the battle. Each color change indicates new tactics. As you enter the portal and come out the other side, a cutscene will ensue. By the end of the cutscene you will be stripped of your brush techniques and will have to regain them one by one from the evil Yami.
- The first part of the battle calls for a melee attack of the giant ball.
- Rush Yami and attack him until he returns your weapons.
- NOTE: The weapons come with the Rejuvenation technique.
- TIP: Avoid Yami's rotating saws as they can deal a lot of damage. Keep the pressure on the massive sphere as hanging back will only allow it to put more holes in the floating platform which in turn will make it harder to maneuver around the battle field.
- Once you've hit him hard enough, he will relinquish the Power Slash technique that can then be used when he is stunned.
- NOTE: After a while he will relinquish the Bloom technique.
- When Yami is stunned, quickly draw a circle on him to open the ball and expose the small and vulnerable real Yami.
- Jump up and unleash all you have one the little glass ball.
- Use the Power Slash and normal attacks to lower its health.
- Repeat as necessary until you have defeated the first phase Yami has up his sleeve.
- NOTE: Yami's sphere will now change colors and have a whole new onslaught of tricks.
- TIP: Avoid flame attacks at the start of this round.
- Power Slash and normal attack him whenever he's not on fire.
- TIP: You will see his deadly attack where he'll split into pieces and flop the pieces around at you like a slinky. Stop this attack all together by simply Power Slashing him while he does it.
- Continue to Power Slash and hit him until he breaks into platforms.
- Climb the platforms and attack the glass ball in the center until he relinquishes the Cherry Bomb technique.
- Use the Cherry Bomb technique to split him into more pieces.
- NOTE: Yami will next relinquish the Waterspout technique. Once you have regained this, he will have a hard time touching you.
- TIP: Power Slash his slinky attack and stop all flame attacks by drawing a line from the water pillars to his flames.
- TIP: The crescent technique will also be useful here. Draw the half moon in the sky and Nagi will appear and cut Yami's larger sphere in half. This gives you more time to hammer away on the small Yami.
- Avoid taking much damage in this phase and continue to work Yami's health meter down until you are able to move into the the next phase.
- NOTE: Yami's giant ball becomes a blue slot machine.
- Power Slash all three dials and see what you get.
- TIP: The images on each dial represent what Yami will shoot at you. Most the objects he fires you can deflect right back at him with another Power Slash.
- Hit the blue claw image on the slots. One or two strikes will make Yami's glass ball appear above or below the giant slot machine.
- Use the Power Slash technique to hit the smaller ball from a distance. Eventually you will regain the Veil of Mist technique.
- Use the Veil of Mist to slow time and Power Slash the slots when the three blue claw symbols appear.
- NOTE: The sphere will crash to the ground and Yami's glass ball will fall out.
- Charge the tiny ball and unleash everything you have on it.
- Use the Veil of Mist here as well to prolong your attack time.
- Finish off the Blue Yami to move on to the next.
- NOTE: The massive sphere now turns into a type of robot ball that walks around on two legs and flails its stretchy arms at you.
- Keep your distance and focus on avoiding Yami's attacks.
- Power Slash the missiles back at the boss.
- Watch carefully for the center to open up and reveal Yami's small glass ball inside.
- Quickly Power Slash Yami from a distance.
- Once the robot collapses to the ground, run up and pummel the Yami's tiny inner ball.
- Use the Veil of Mist to get some more attacks in before he stands back up.
- NOTE: Once sufficient damage is dealt, you will regain the Thunderstorm technique.
- When Yami's arms stand straight up, draw a line from a thundercloud to Yami and shock him.
- After he drops, deal more actual damage.
- Continue this pattern until the next phase begins.
- Watch the cutscene.
- Draw a sun in the blackened sky to bring light to the world and stun the evil Yami.
- After the hand drops and Yami's small glass ball rolls out, Veil of Mist the scene and attack the ball.
- Back off to avoid Yami's attacks once the hand retrieves the small ball.
- TIP: You are able to stun the hand when it is light out using normal melee attacks.
- Continue to attack the hand until it collapses.
- TIP: Power Slashes will not work as the glass ball will cover itself.
- Wait for the hand to black out the world again.
- Create the sun to stun it and hammer on the exposed Yami.
- NOTE: This battle is time consuming and requires patience.
- TIP: Exorcism Slips' will help if you have them.
- Keep whittling away at Yami's health and eventually you will defeat the master of darkness.
-
- Congratulations, you have beaten Okami!
-